If you're a doctor looking to expand your practice and begin offering online consultations, you're likely wondering where to start. You open the Software Advice website and see 253 platforms for ‘telemedicine’ queries, many of which have a rating of 4 stars or higher. But you have no time to choose and learn new software! After all, patients don't stop getting sick, reports pile up, and colleagues’ advice differs from one another.
To make informed decisions, trust the statistics. The #1 trend of 2025 in online doctor consultations is EHR-embedded telehealth, used by 84% of physicians. It means a one-stop solution that covers the basics of daily routine and automates the online consultation business. These are the platforms with integrated features for better data interoperability and the quality of healthcare services.
Don’t waste time googling: one such platform is Medesk, designed specifically for medical professionals to manage both in-person and virtual consultations.
Are you ready to bring your practice online? In this guide, we will show you how Medesk can help you start offering telemedicine services with ease. We will walk you through the steps of setting up your online consultation platform using Medesk, guiding you through the process with actionable tips and clear steps.
You will learn how to:
- create and set your account;
- schedule consultations;
- manage patient information during video conferencing;
- charge patients;
- analyse your performance;
- and meet all legal requirements to provide secure implementation of telehealth.
Learn how to simplify your practice workflow and free up more time for patients with Medesk.
Open the detailed description >>The following guide outlines the step-by-step process to start offering online consultations via Medesk. These steps ensure that your practice is well-prepared for a seamless transition into online healthcare consultations.
1. Create your telehealth profile for enhanced patient acquisition
To get started with the platform, register at https://www.medesk.net/en/. You will have immediate access to 17 modules of the platform and 15 days of free access to the platform to test everything you need.
Step 1 is to set up a profile in your Medesk personal account:
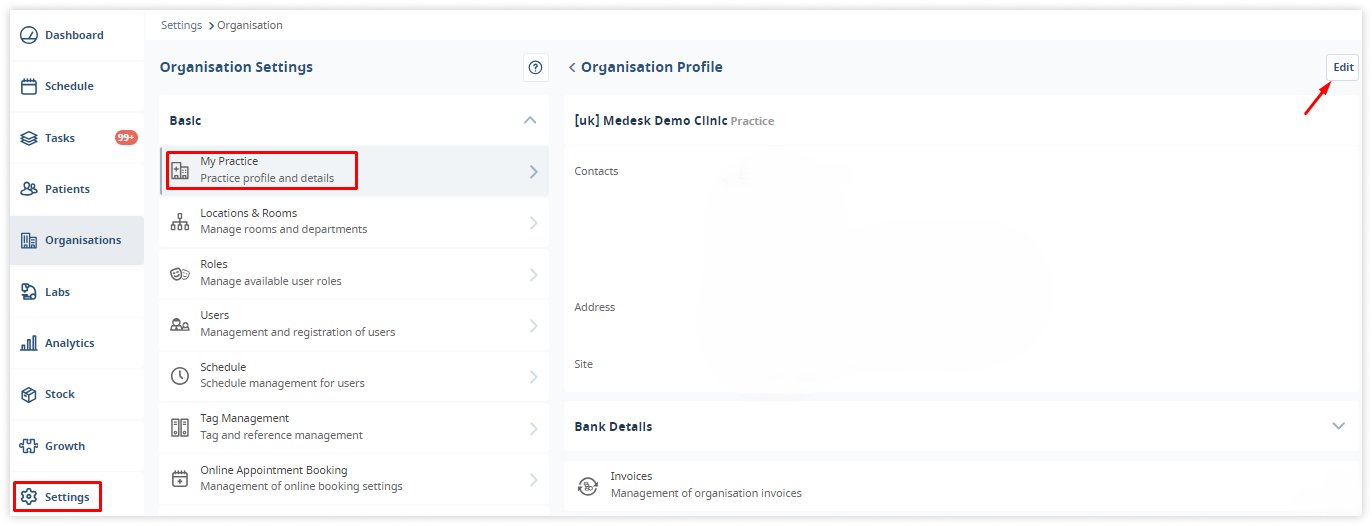
Your time zone and currency will be defined automatically. If you want to change the time zone, appointment times and schedules will be updated accordingly.
The next important step is the description of your services. This will be displayed during online booking for patients to see. Think of your profile as your digital clinic—it needs to reflect your expertise, specialisation, and professionalism.

Studies show that providers with complete profiles have a 30% higher chance of being chosen by patients compared to those with incomplete profiles.
Add your bank details for invoicing and click Save.
2. Set up customisable appointment scheduling options to attract more patients
Next, you need to configure your schedule to accommodate online consultations. This involves setting your working hours, consultation types, and appointment duration.
Medesk allows you to create a customisable calendar where you can define specific time slots for virtual consultations. You can set different availability for various types of appointments (e.g., follow-ups, first-time consultations).
To set up your schedule, go to Settings → Schedule. A calendar with dates will appear opposite the specialist's name, clicking on which you can add or change working hours:
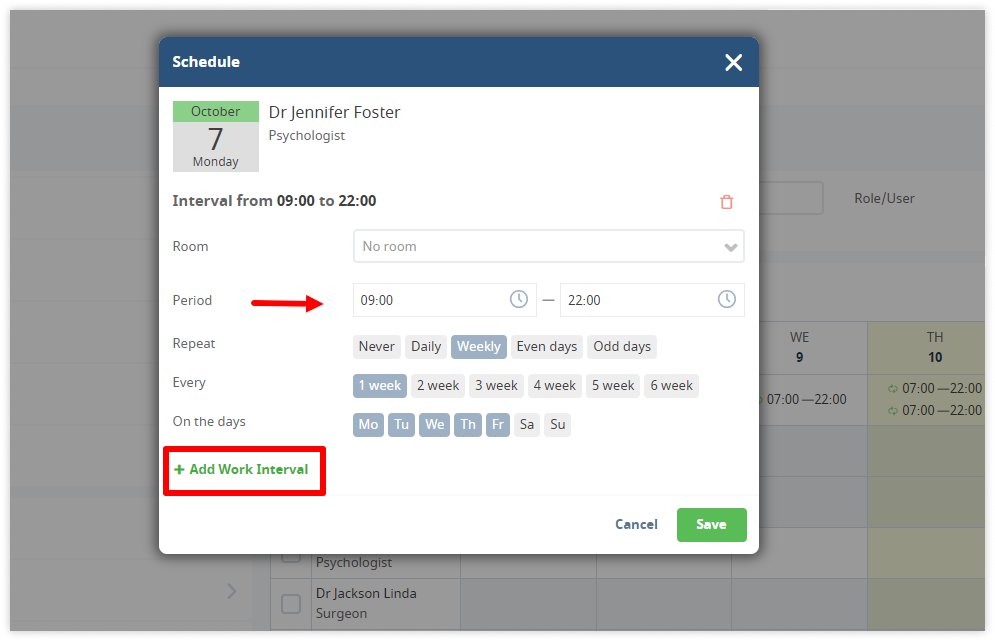
To block specific time slots in your schedule, click on the first time slot to be affected by your block, and instead of proceeding with the booking process, click the button at the top entitled Block this time?

The next thing to do is to choose appropriate consultation lengths based on your expertise. For example, a standard online consultation might last 30 minutes, while a detailed review may require an hour. To set the duration, go to Settings → Online Booking → Items:
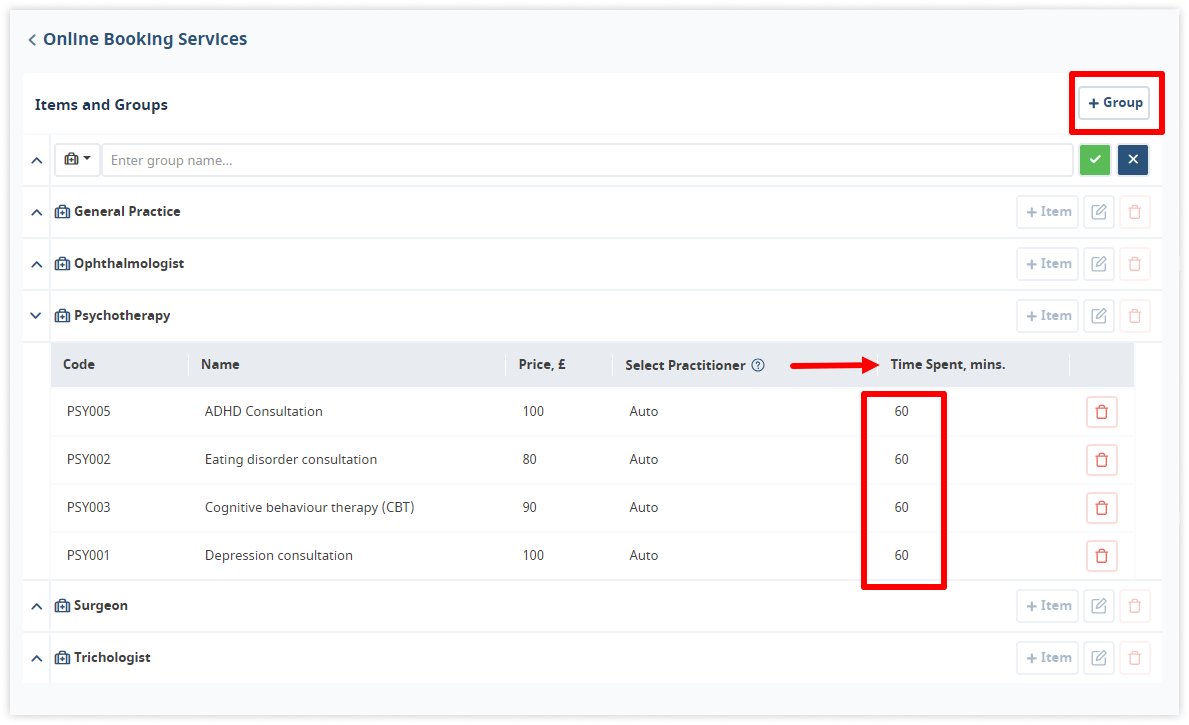
You can change the default settings and add your service by clicking on Group in the top right corner of the page.
Medesk helps automate scheduling and record-keeping, allowing you to recreate an individual approach to each patient, providing them with maximum attention.
Learn more >>3. Manage patients hassle-free with Medesk patient profiles
One of the advantages of Medesk is its seamless integration with electronic health records. This ensures that you have all relevant information at your fingertips during a consultation.
Before a consultation begins, you can review a patient's entire medical history, previous treatments, and any uploaded documents like test results or scans.
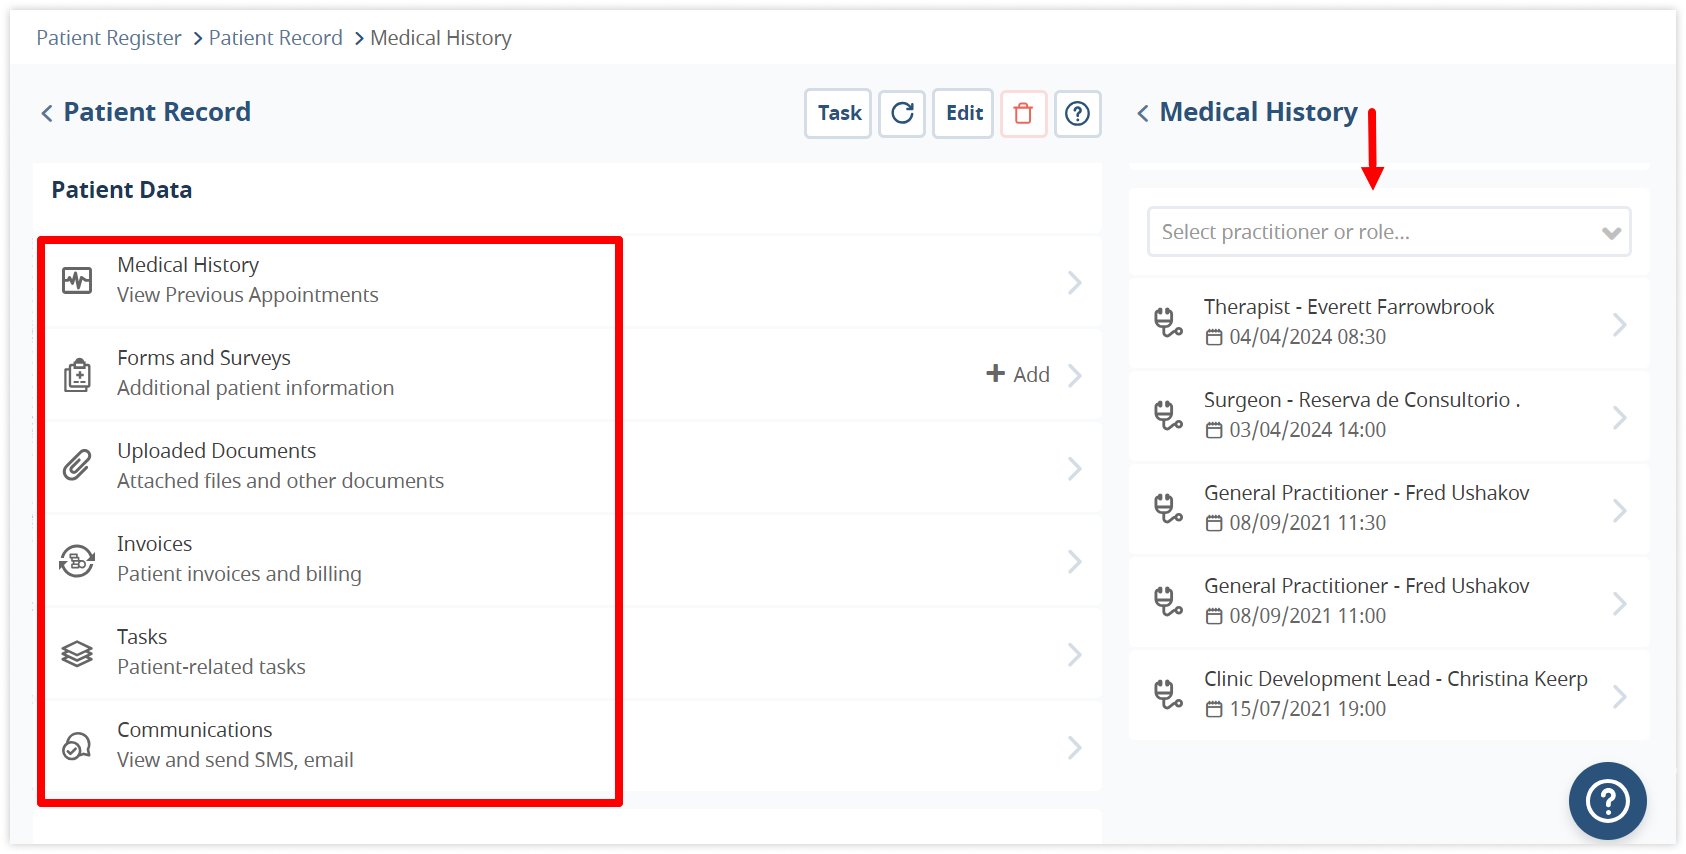
To create a patient record, choose Patients on the side bar, click the + button, and fill in the information:
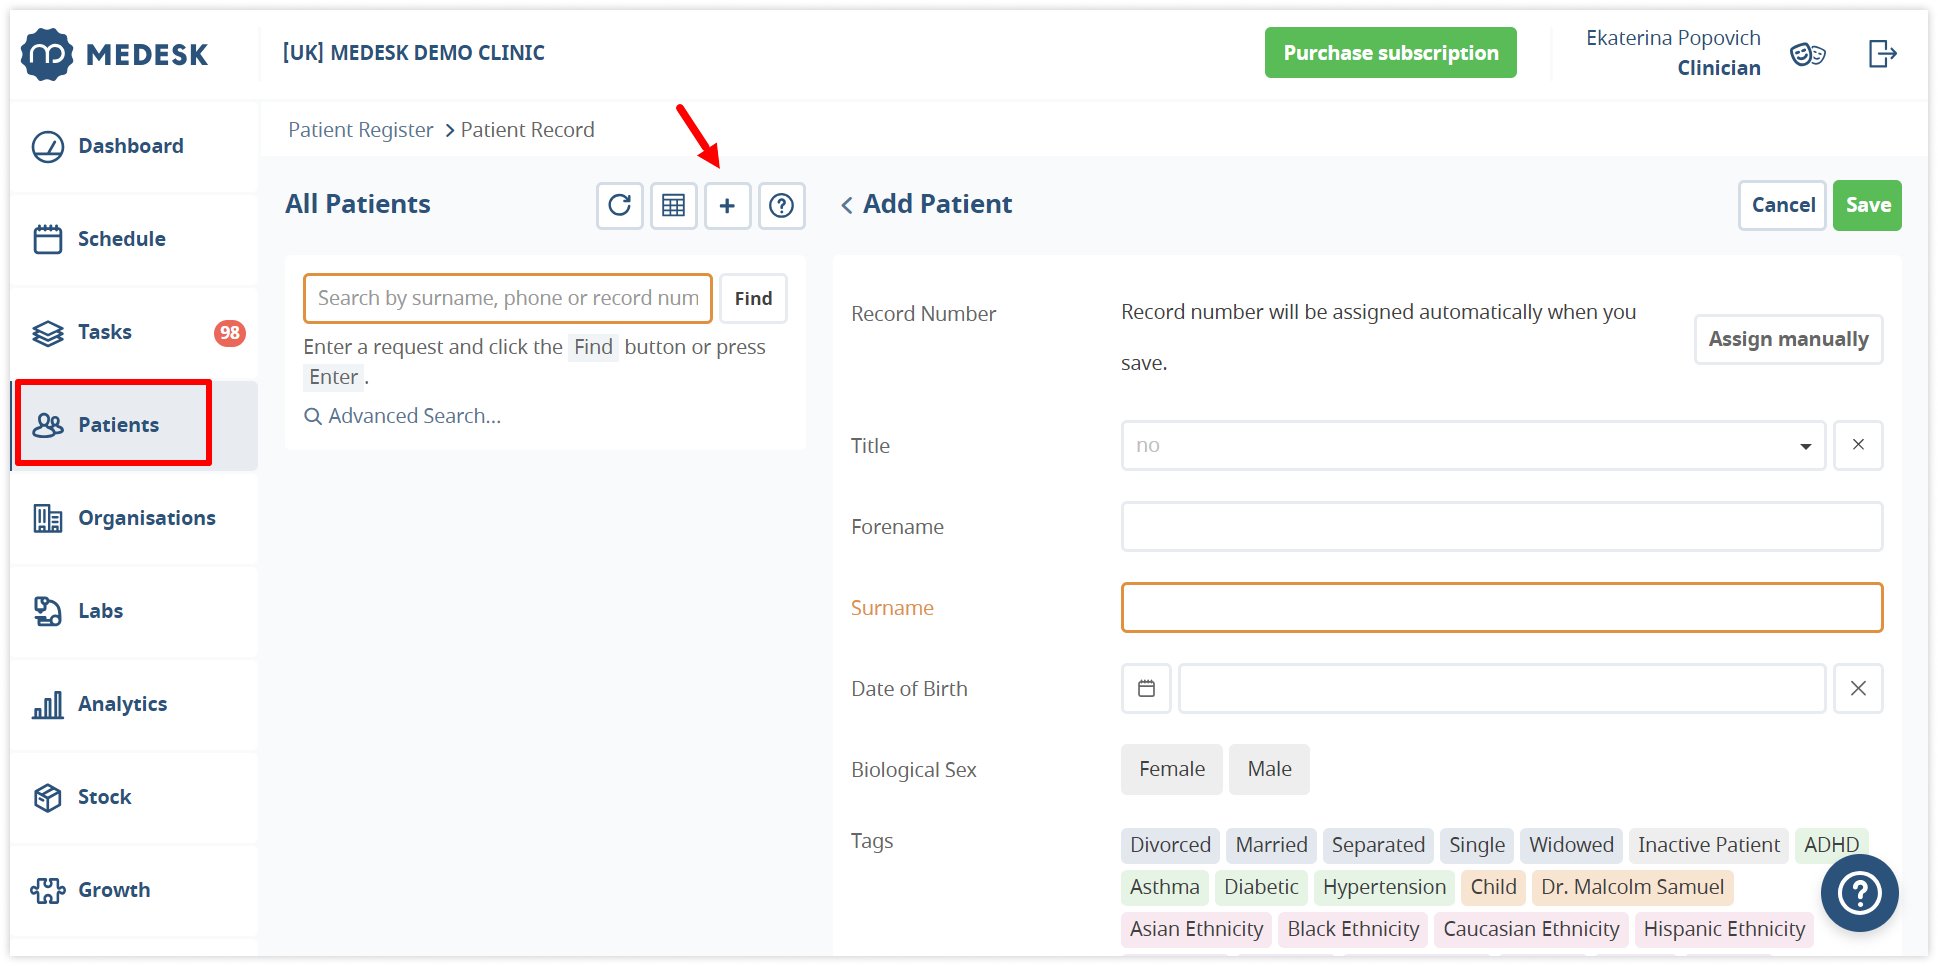
Pre-created or imported profiles of your patients help you get them to appointments faster.
4. Let your patients book appointments by themselves and free up your workflow
Let's say you receive a call or email from a client asking you to book a video consultation. To fulfil their request, click on the desired time slot in the calendar. A New Appointment pop-up window will appear in front of you.
To book an online consultation, you will need to fill in the patient details and move the slider next to Online Consultation to Yes. If it is a new patient, you will be able to create a new profile directly from the same window.
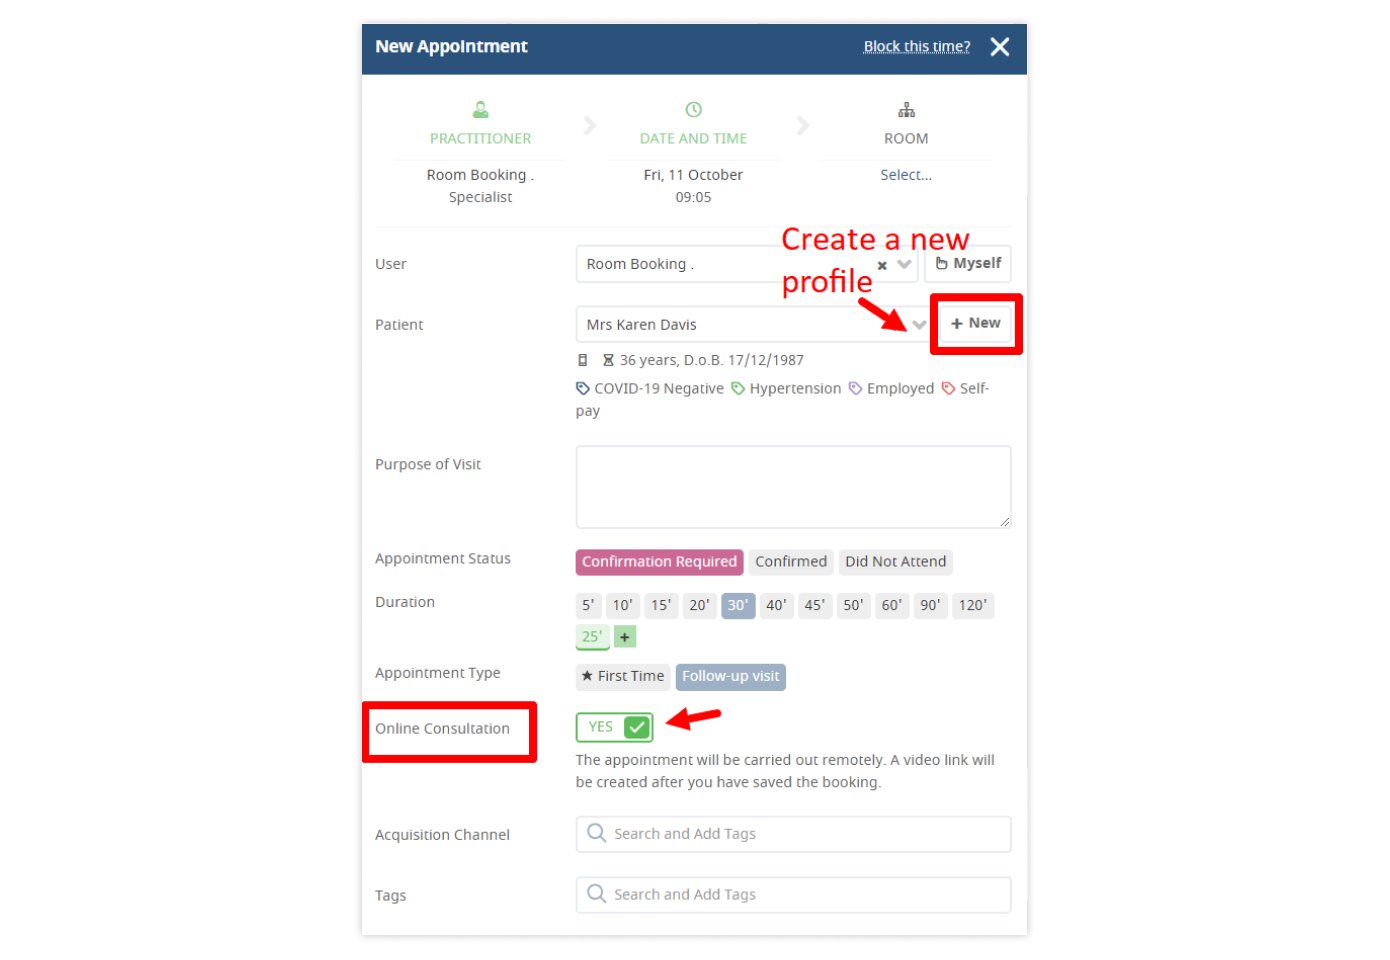
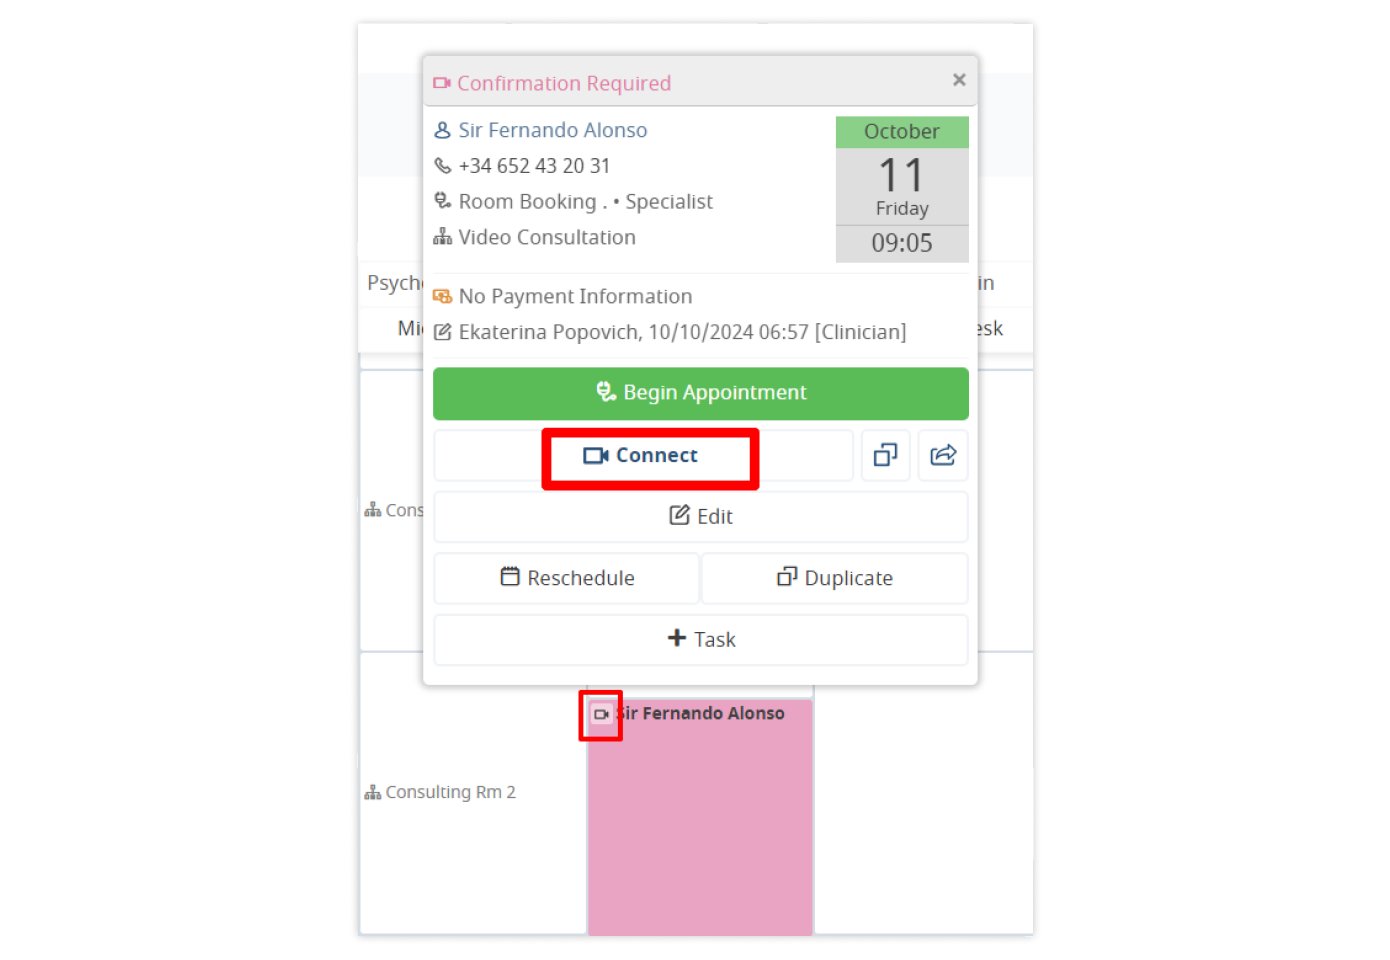
After that, the appointment will be displayed in the calendar with a special icon for video consultations. And when the appointment time comes, you can start the call directly from the card in the calendar:
This method is great for practices with a small number of patients. What if there are 100, 200 patients? Signing them up yourself means wasting half a doctor's or assistant's day. Medesk solves this problem by providing its clients with the Online Booking and Patient Portal modules.
Thanks to it, your clients can choose their own time and book consultations themselves, even outside your working hours. We show you how to give them this opportunity.
Online booking module is automatically connected in your trial version and is available after its termination in Pro Plan.
You can configure the module by going to Settings → Online Appointment Booking. General Settings allows you to configure authorisation for patients. Choose how patients will confirm appointment bookings (SMS, email) and what information to include in the appointment form:
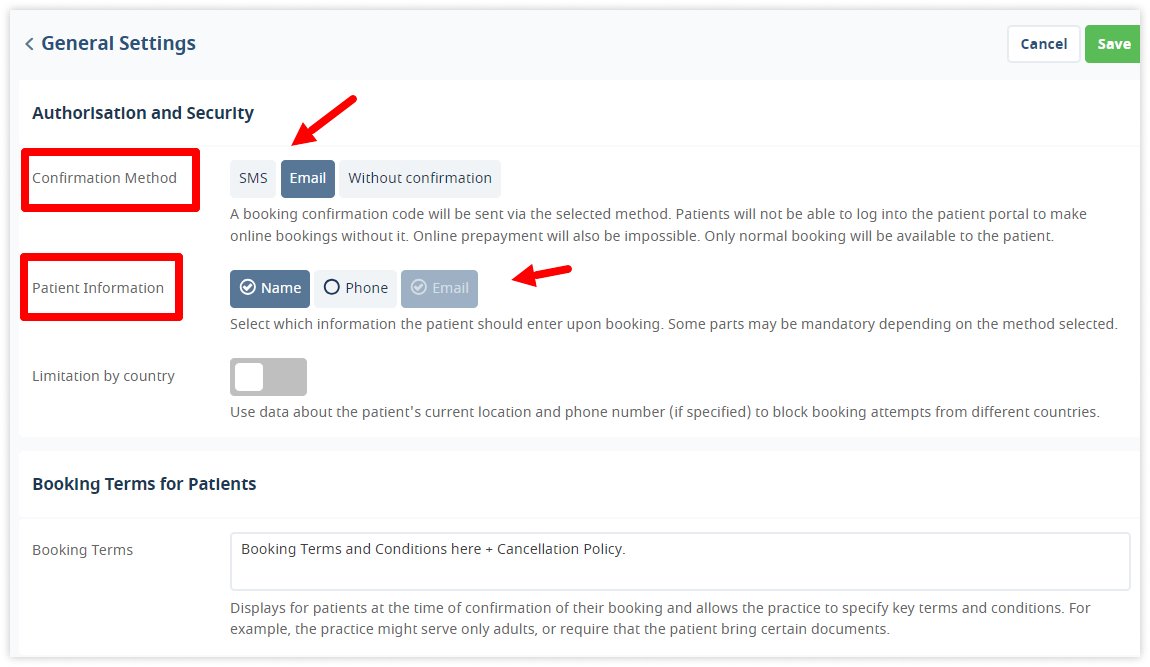
You can select specific countries for which online consultation booking is available. To do this, move the slider next to Limitation by country and select allowed countries. This feature allows you to minimise fraudulent activity and attempts by competitors to book all available appointment windows.
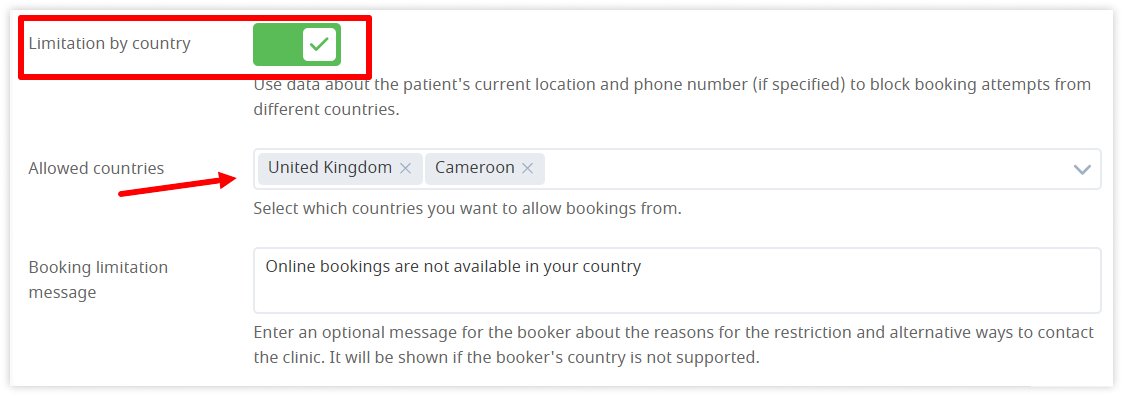
On the same page, you can select the earliest and the latest time for online booking to be made available.
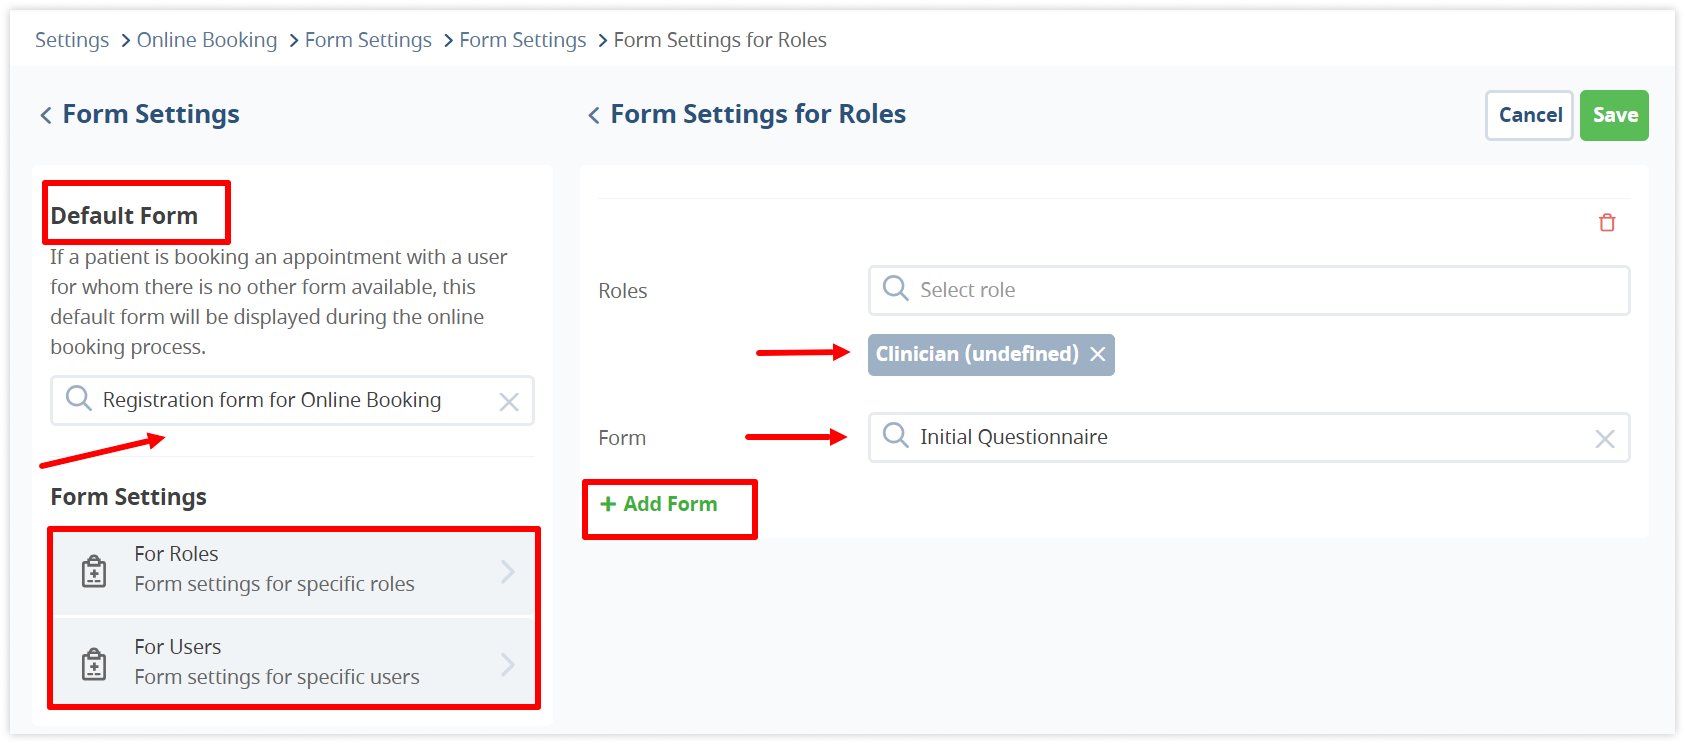
Along with the appointment notification, patients can receive an email or SMS with a link to an appointment form before their appointment. In Settings → Online Booking → Form Settings, choose which form link your patients will receive. You can choose from ready-made forms such as Initial Questionnaire or Registration Forms. Or you can create your own form using the platform's inbuilt form builder.
Customise your intake forms to request specific information depending on the consultation type. For example, telepsychiatry appointments may require detailed questionnaires about mental health history.
The forms can be customised for different roles, i.e., doctor specialties, and for different users:
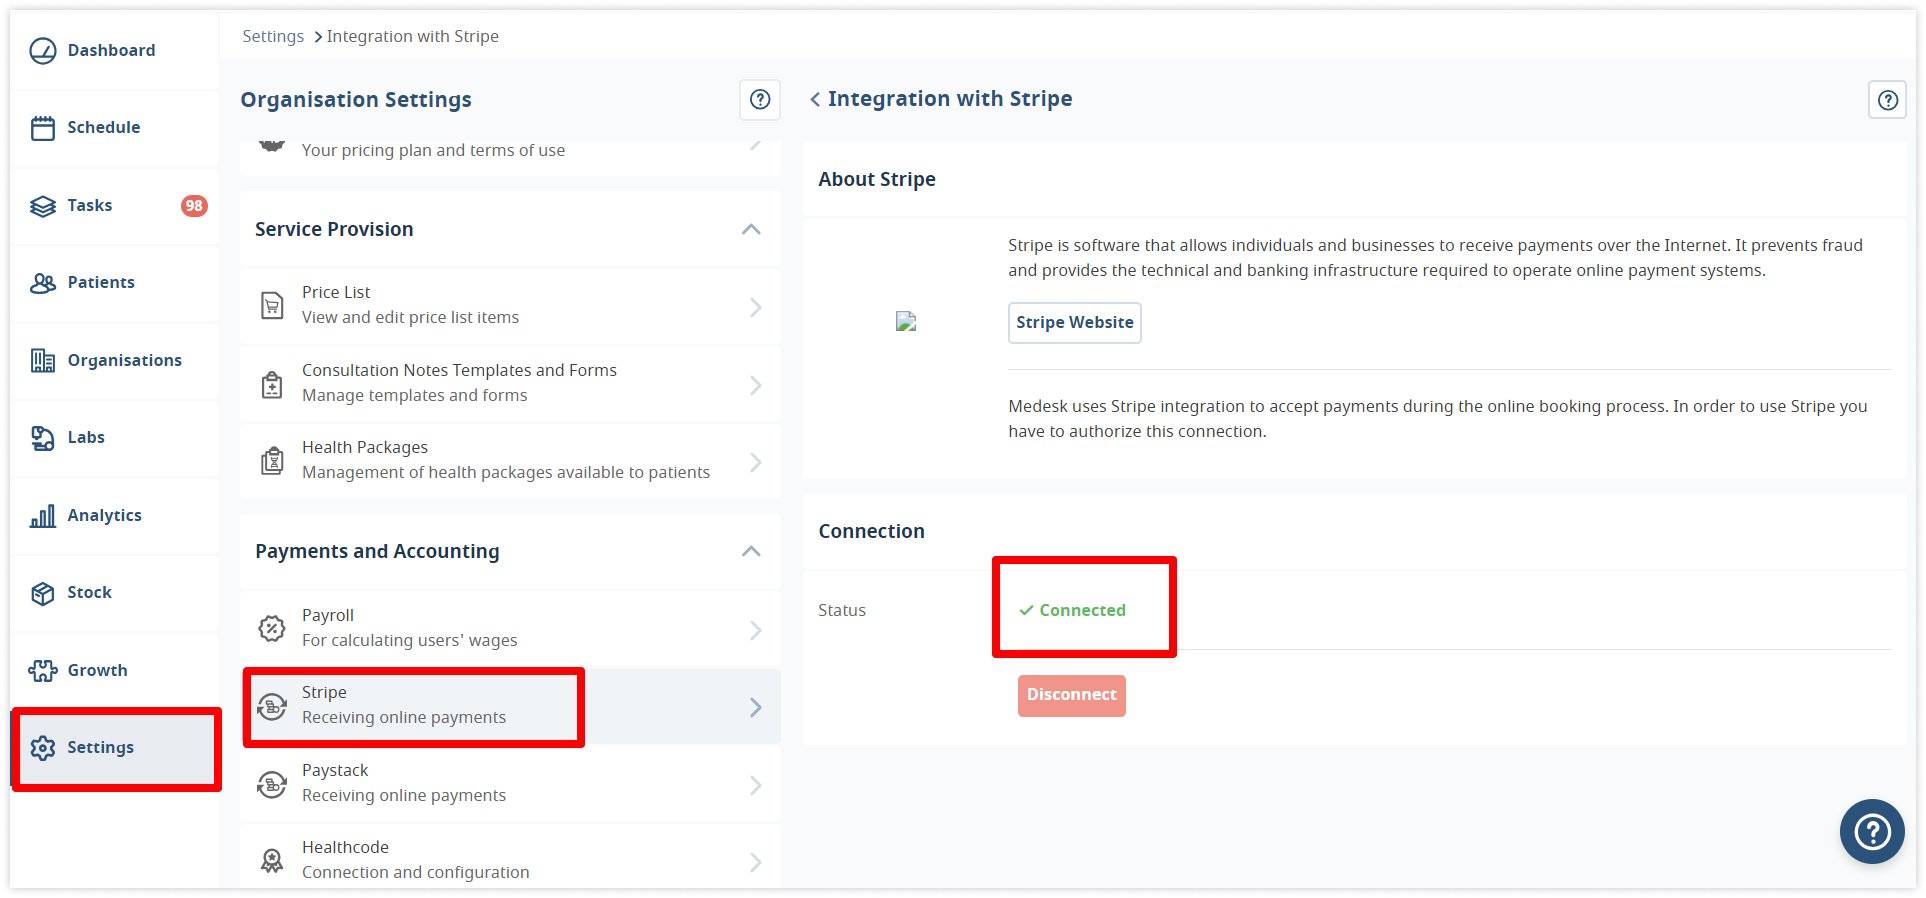
To protect yourself from loss of revenue, set up prepayments for online consultations. Medesk supports integration with Stripe, which can be activated in Integrations Settings:
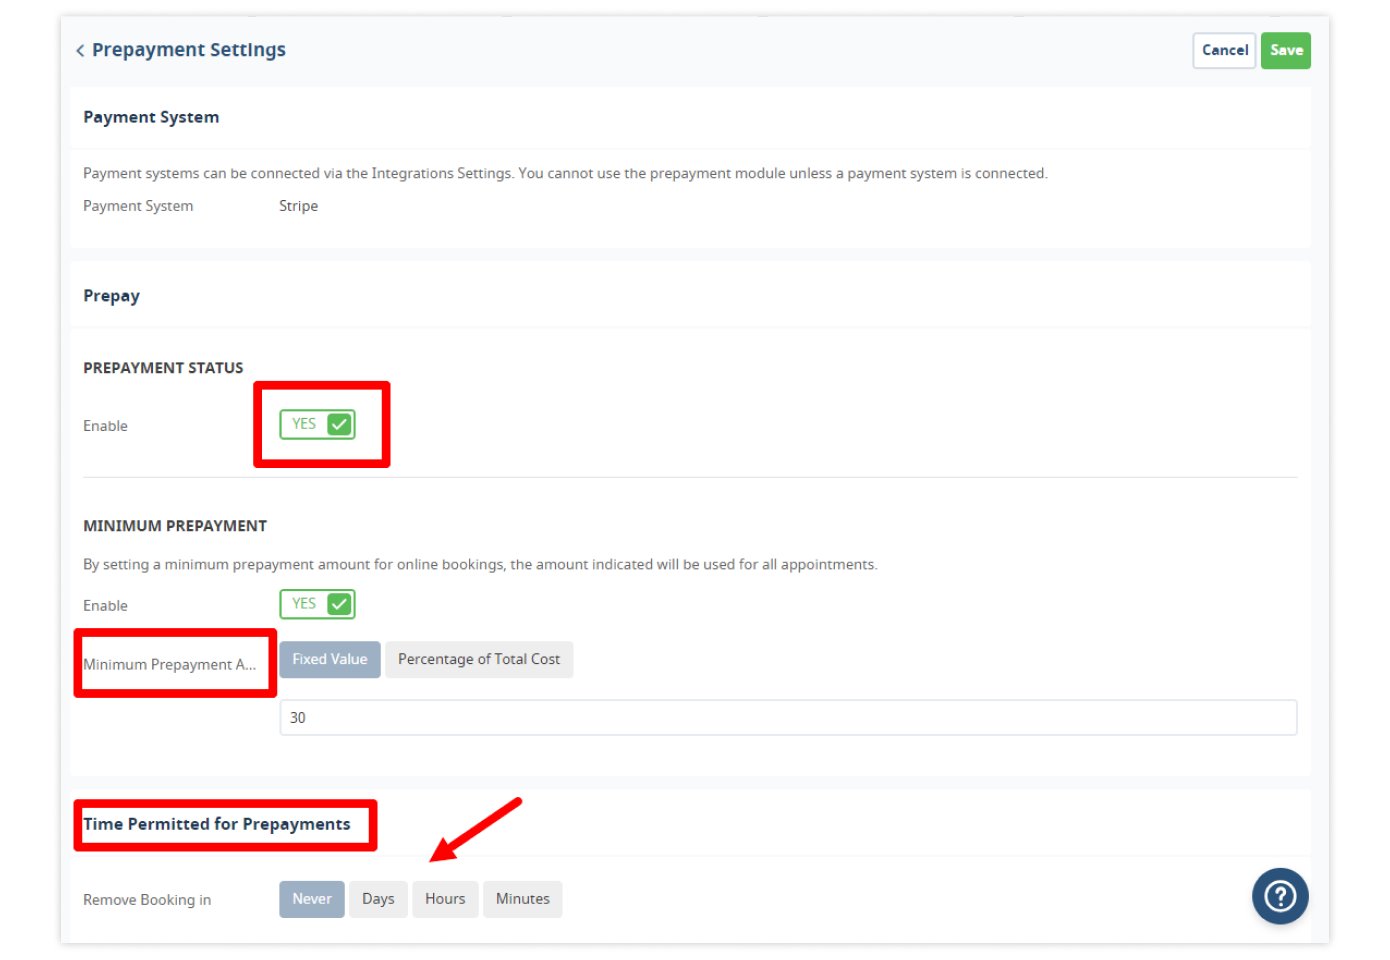
To configure minimum prepayment and time allowed for prepayments, go to Settings → Online Booking → Prepayment Settings:
Initially, two automatically generated links are available in Online Booking:
- Booking options
- Patient portal.
With the Link Builder tool, you can create special links associated with your chosen acquisition channel. These links will send patients to the exact step of the booking process that you specify. You can create links for individual practitioners and services, amongst other things.
To create a special link, go to Online Booking → Link Builder. In a separate window, select the booking channel and start page, and your link will be generated automatically. Use links on your website, aggregators, SEO articles, or social media to attract a target audience.
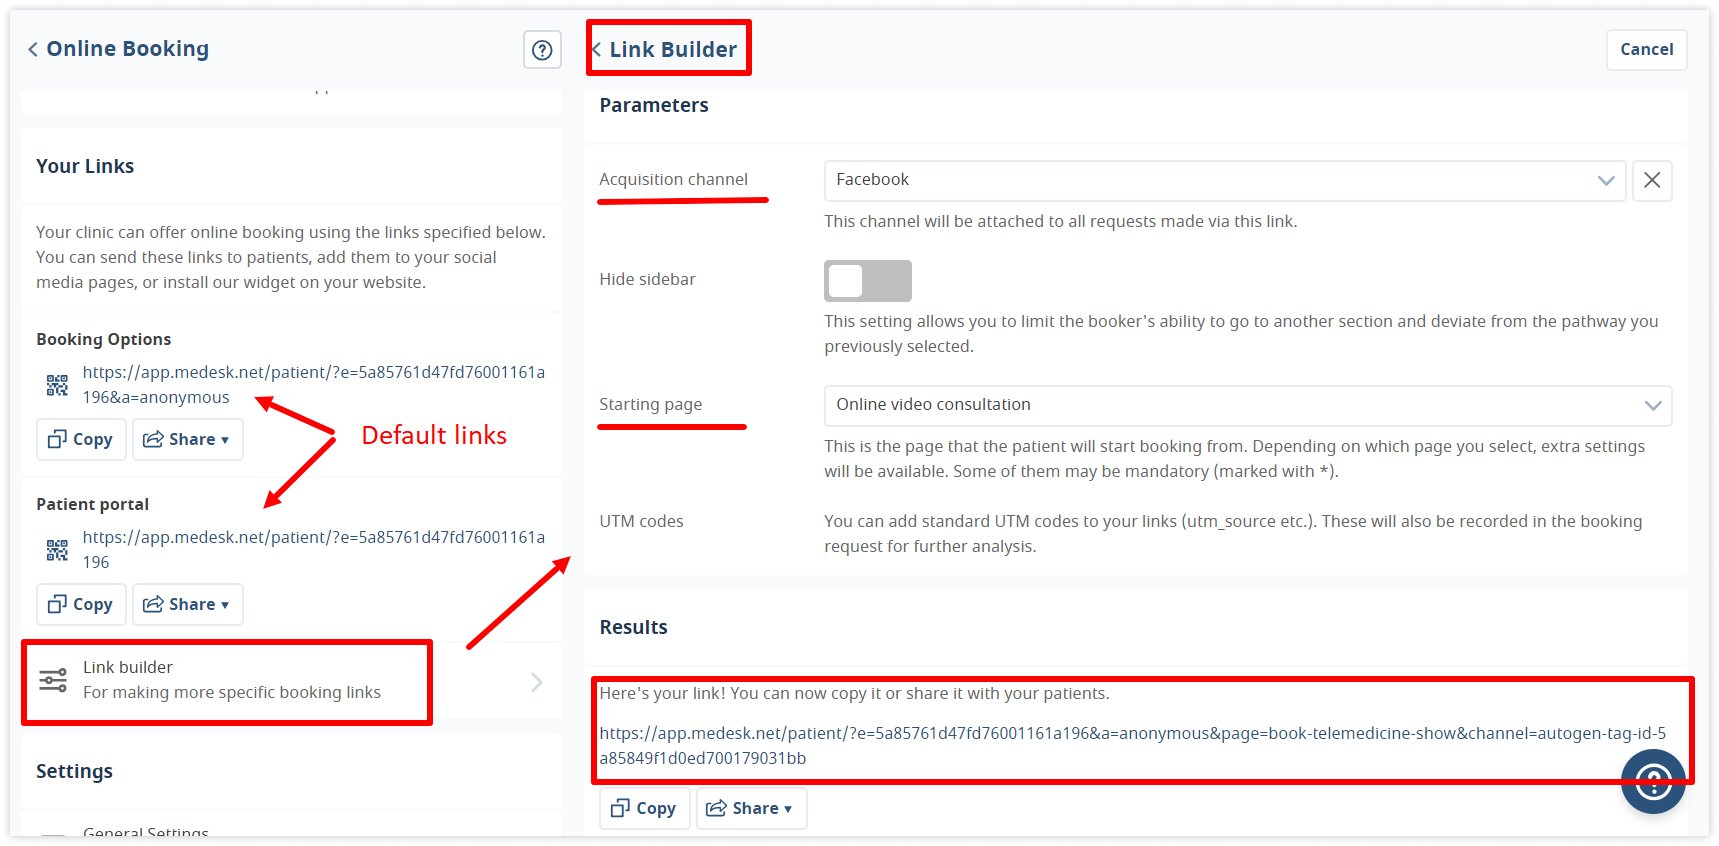
If you create a separate link for booking online consultations, only services and specialists for whom this type of appointment is available will be displayed on the appointment page and in the patient portal.
This is what the booking portal looks like for your patients in Medesk:
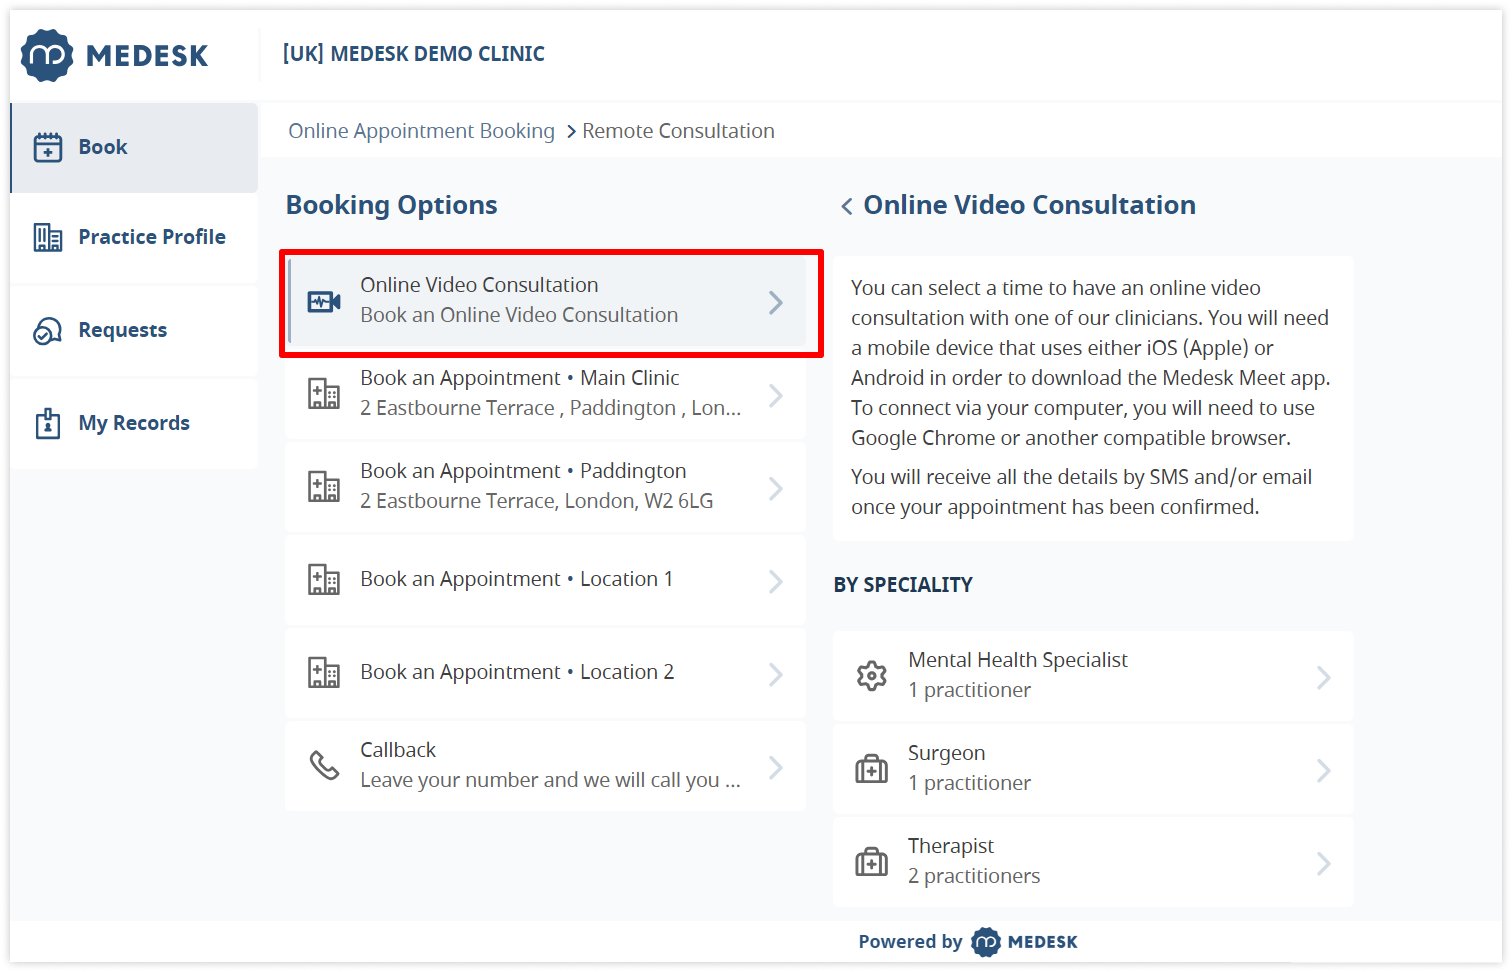
With the Branding module connected, you can change the look of your booking portal and the interface of the software as a whole.
5. Spend less time on charting with the Medesk platform
With everything set up, you're ready to start your first consultation. Medesk uses a built-in video consultation platform, eliminating the need for third-party software.
When the appointment time arrives, simply click the Begin Appointment and Connect buttons in your calendar, like in step 4 of our guide. The first button will lead you to the patient and appointment details, the second to the video call itself.
You can send your patients a one-off SMS to help them connect to the call. Use the same appointment pop-up window from the calendar:
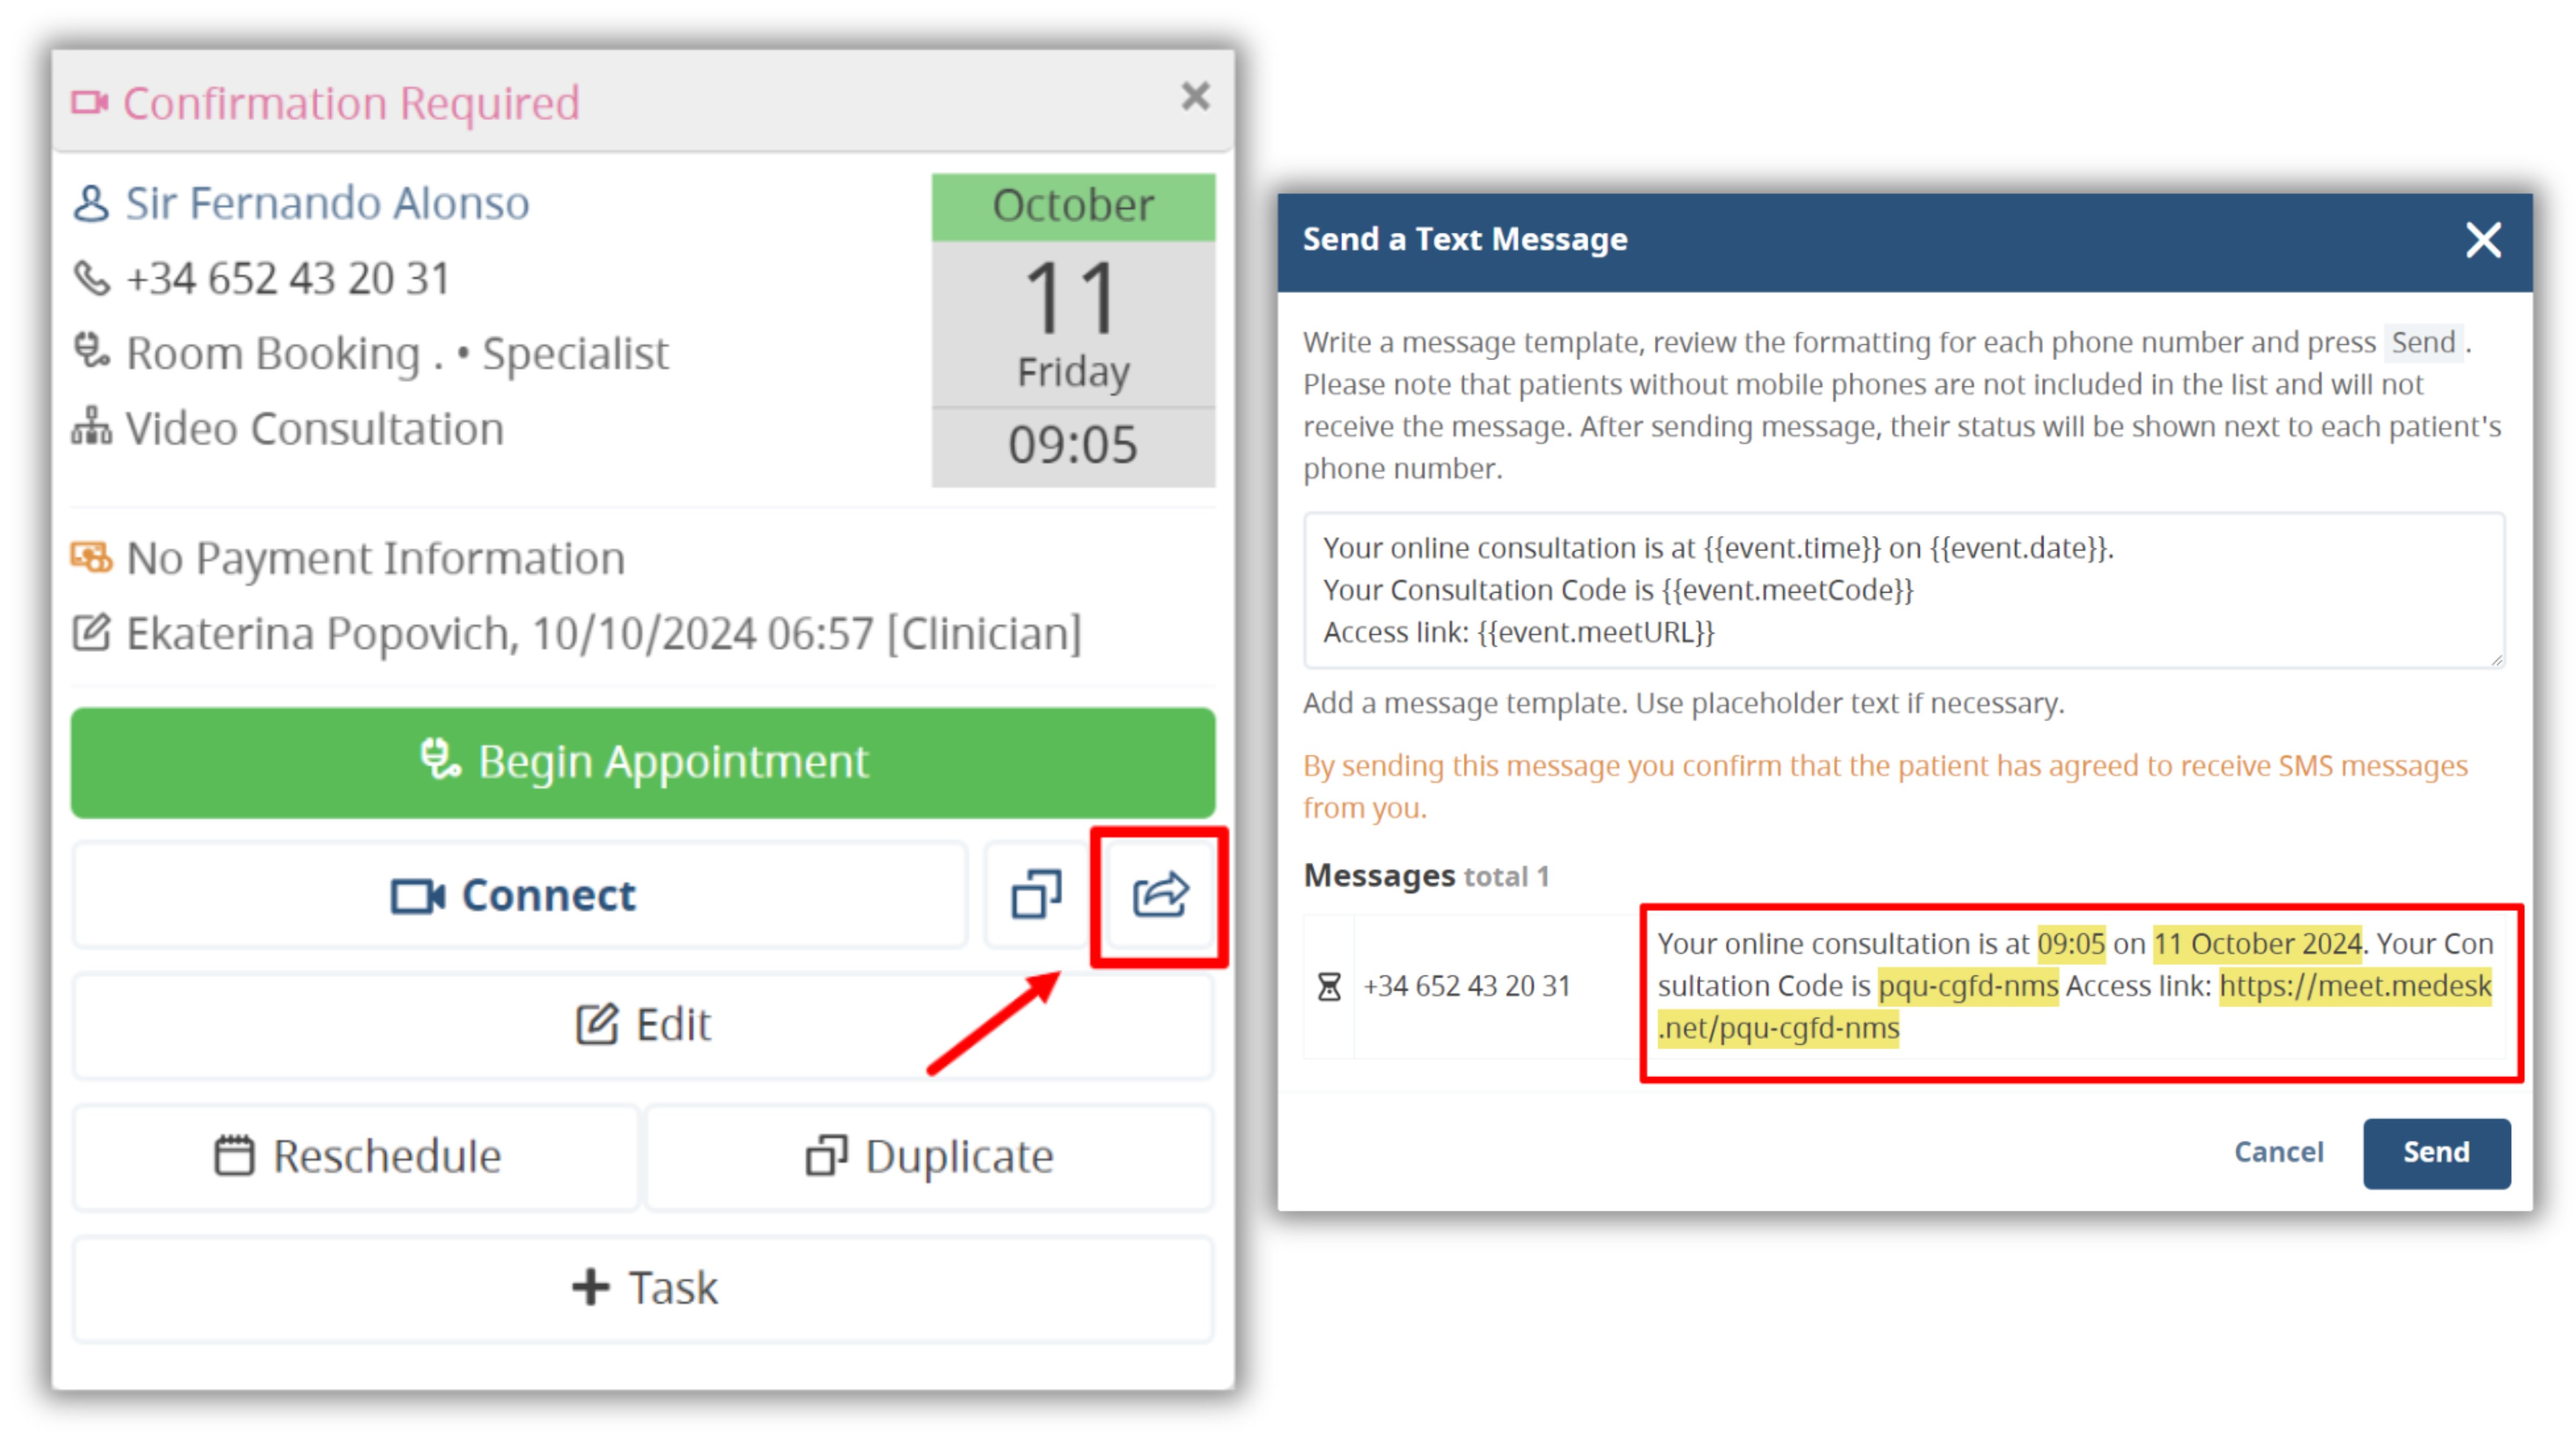
Check the message content and then send it. But to save time and speed up the process, you can adjust the automated appointment reminders for all of your appointments.
Patients can use their video link via the web browser on their computer. Alternatively, they can use the Medesk Meet mobile app for Android or iOS on their smartphone or tablet.
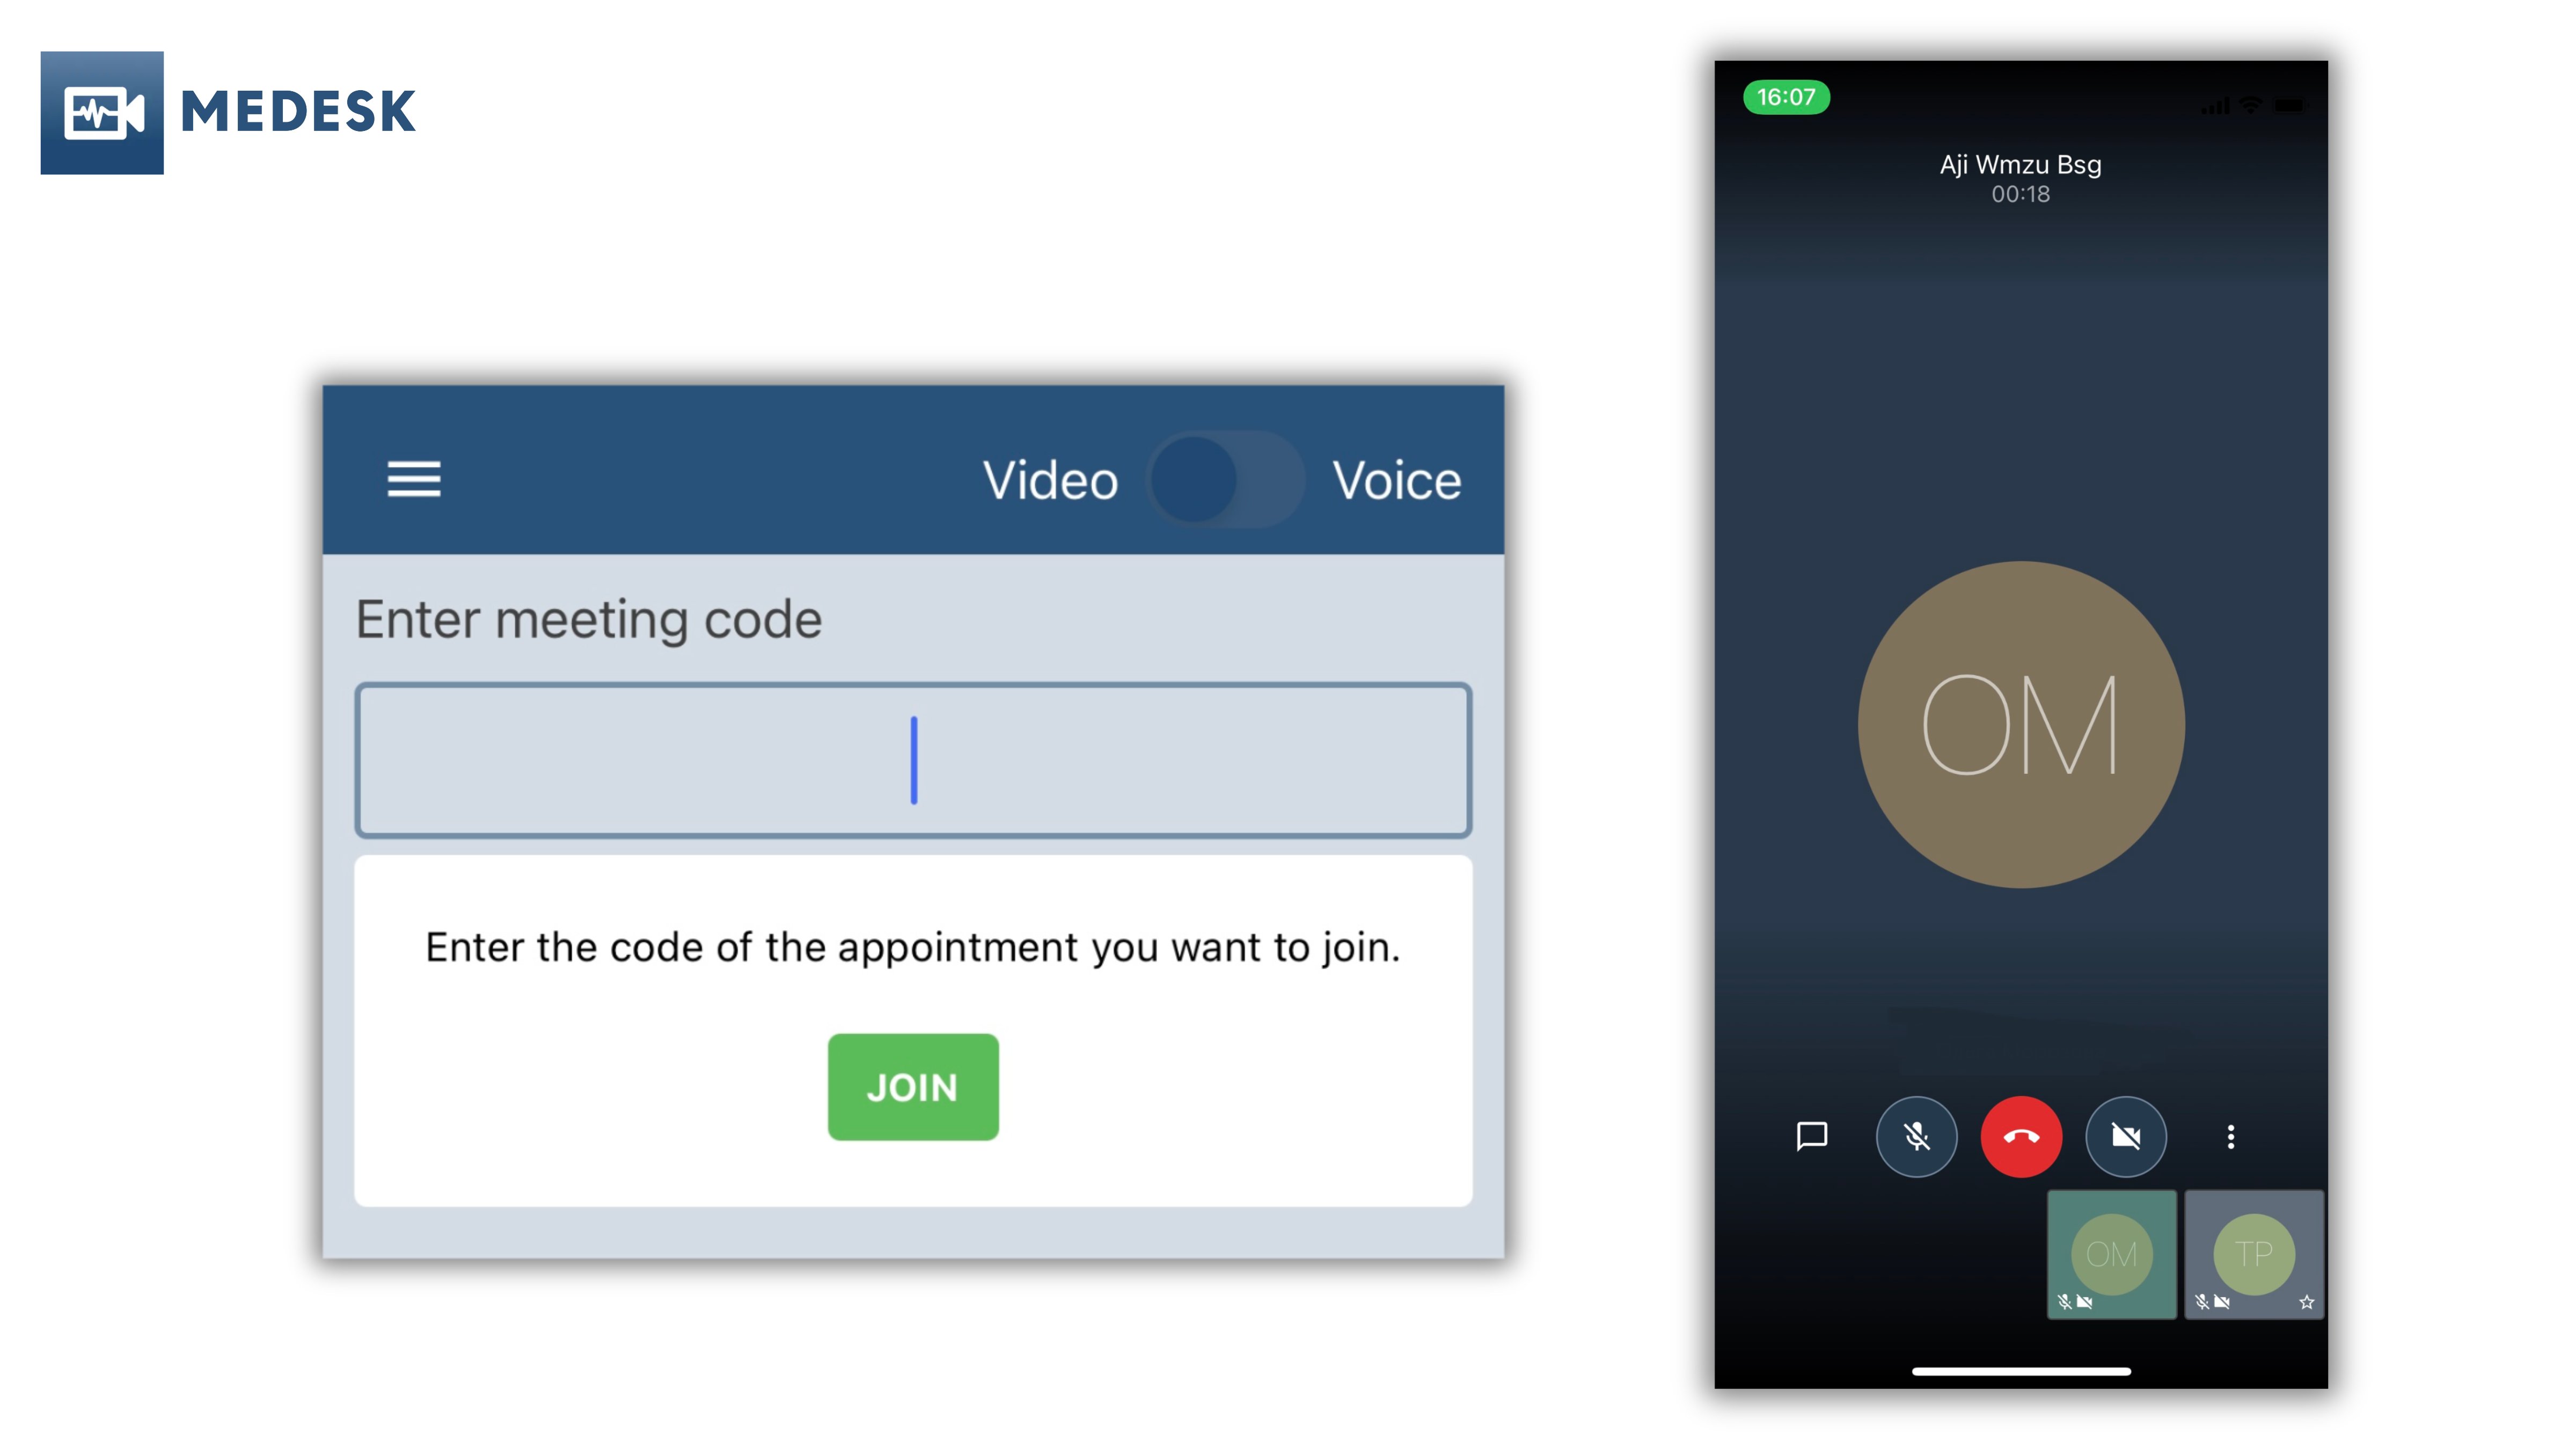
Both the video consultations and patient data are encrypted end-to-end, ensuring that sensitive information is protected. Medesk provides tools to help you maintain compliance with national and international telemedicine regulations like GDPR.
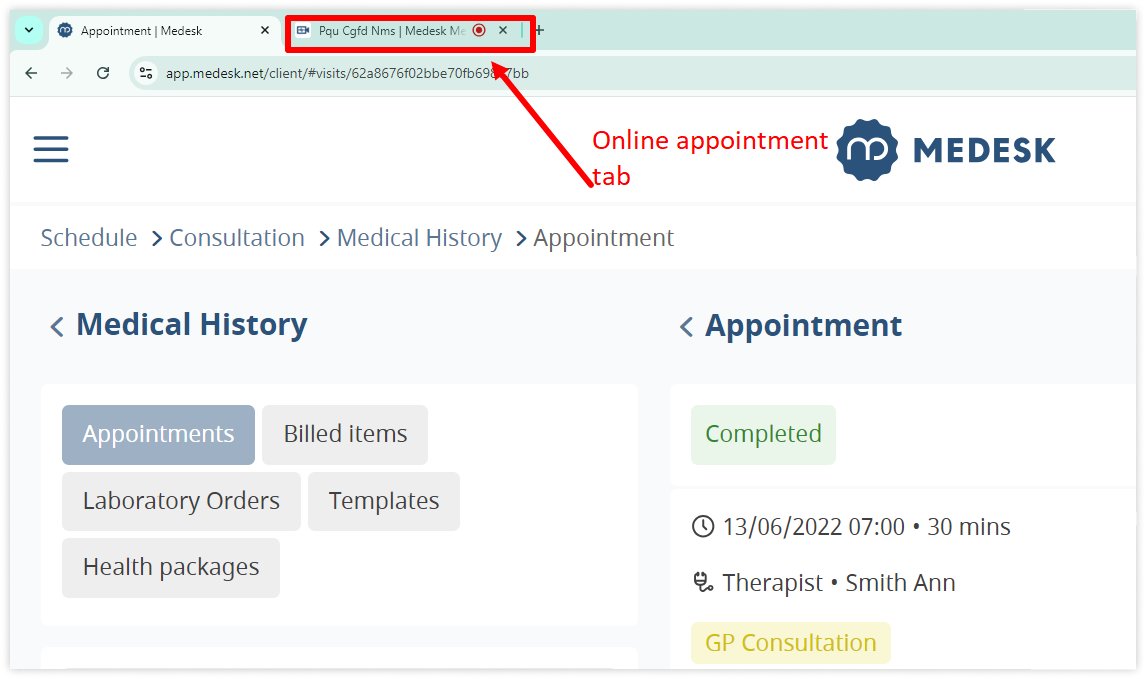
During the call, you can take notes directly in Medesk and even prescribe medications or issue lab test requests. You can switch between different tabs of the platform. To open your consultation notes while on a video call, all you need to do is go to the next browser tab:
Medesk includes more than 60 ready-made forms and templates for 24 medical specialities with built-in BNF and ICD-10 databases. During an online consultation, you can create treatment plans, add patient data, and upload images to the patient record. The auto-fill function helps to halve the time spent on filling out documents: you don't need to fill out routine patient information as it gets added to your notes automatically.
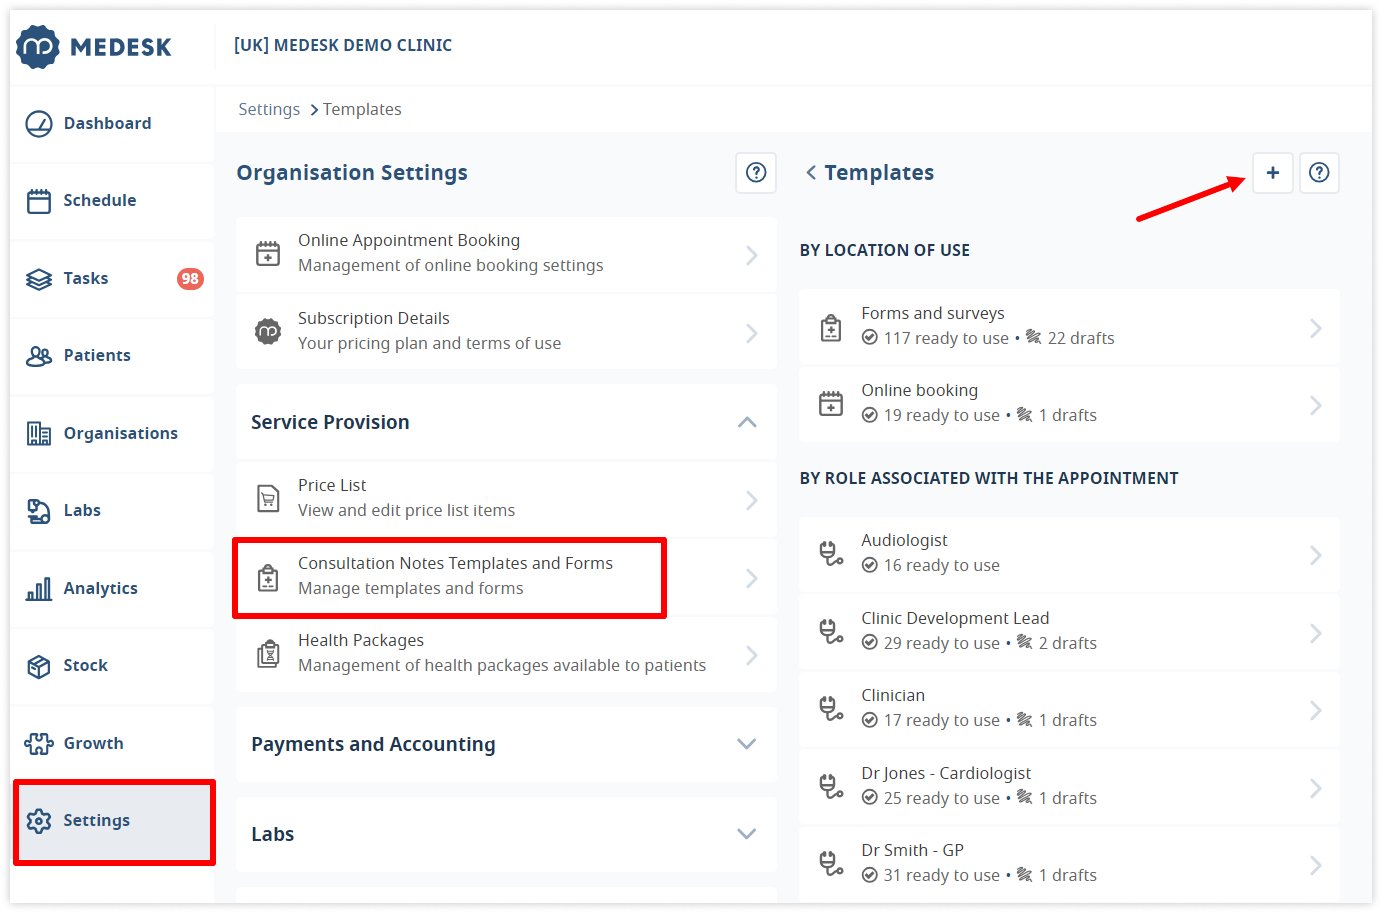
To create or edit a consultation note, go to Settings → Consultation Notes Templates and Forms and click +. This will open the Select from library and Manual template creation pages where you can choose a ready-made option or create your own.
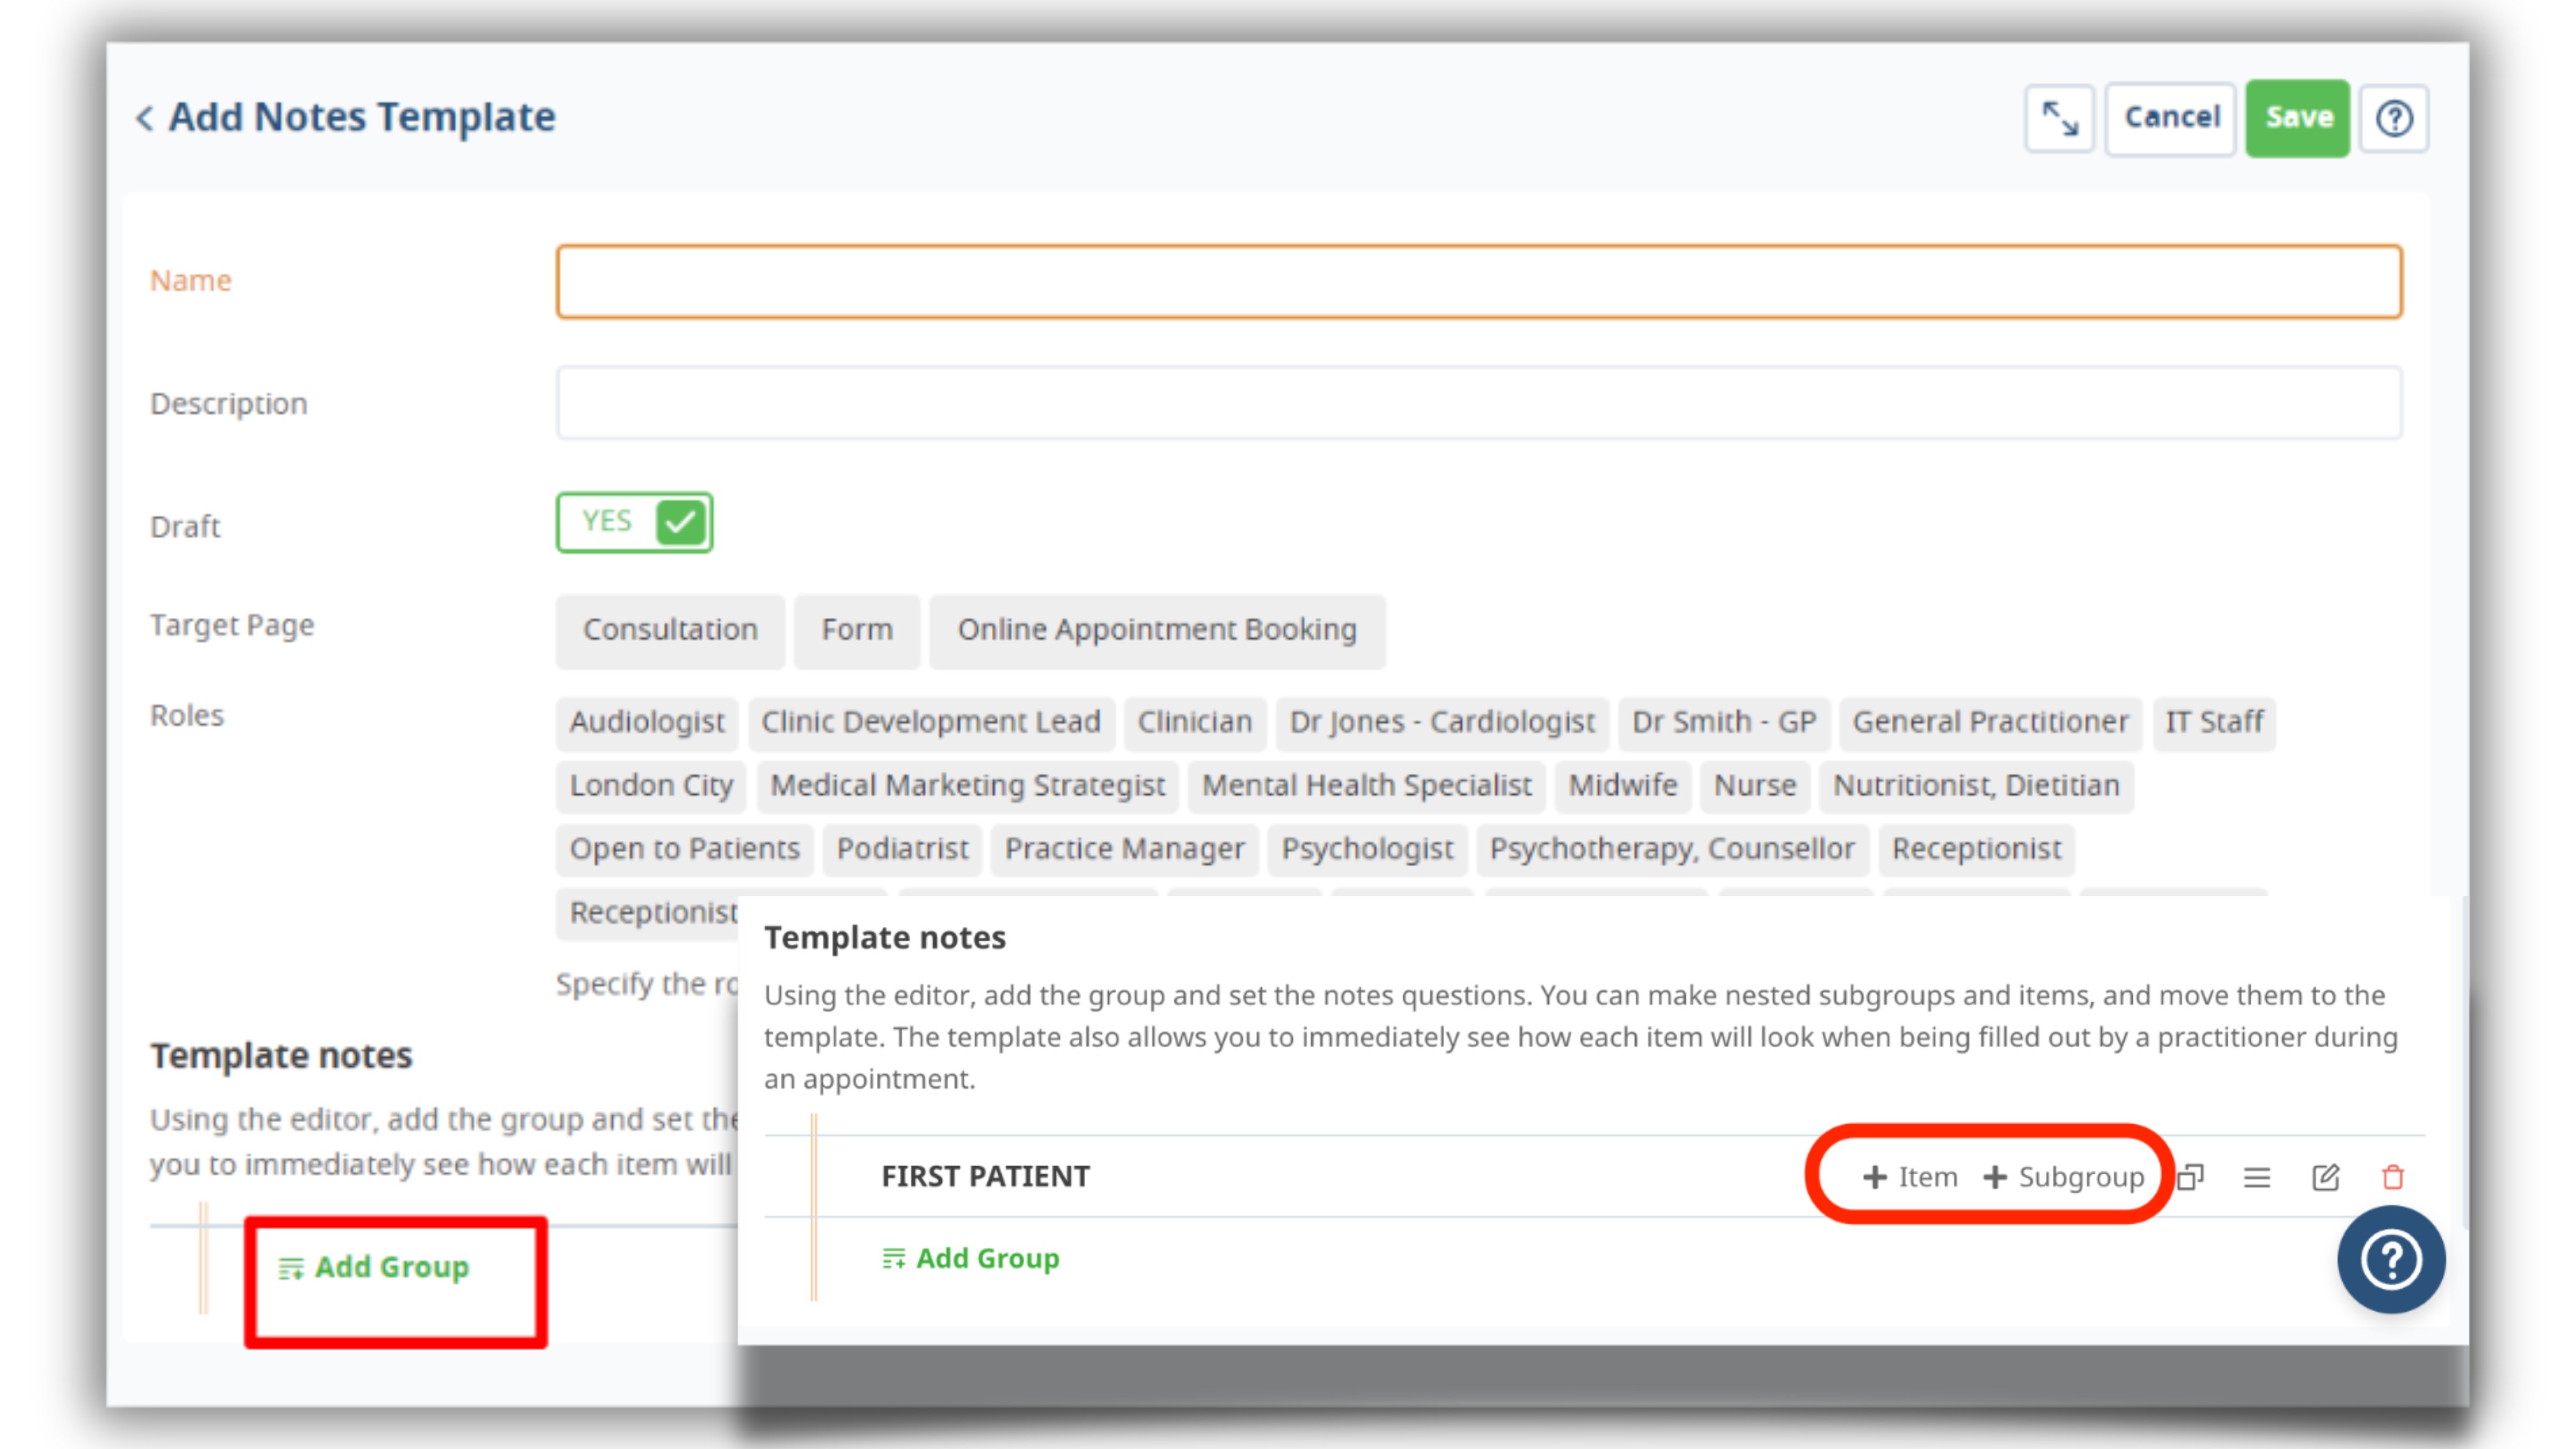
Note editor allows you to create a template for individual roles, or multiple roles. Click on Add Group to set the notes questions. You can now add items and subgroups to the group you have just created. To do so, click the appropriate buttons:
To add any of the created or existing templates to an intake and start filling it out, start the intake, and then from the intake card, go to Forms and Surveys → +, choose a template, and click Fill Out:

Fill out the form, click Save, and the data will automatically load into the appointment card in your calendar and patient profile.
In the rare case of a connection failure, Medesk allows you to reschedule or reconnect without losing any data from the session.
Discover more about the essential features of Medesk and claim your free access today!
Explore now >>6. Keep your finances under control with medical billing and payment
We’ve learnt how to charge patients for online consultations with Stripe payment gateway integrated within Medesk and avoid no-shows. Now let's look at how you can charge patients for online consultations with Medesk.
The easiest way to issue an invoice is to open the appointment cards in the schedule and click +Invoice. If you have already completed the consultation, you will see information about the services rendered. To issue an invoice for these services, click Add Items to Invoice.
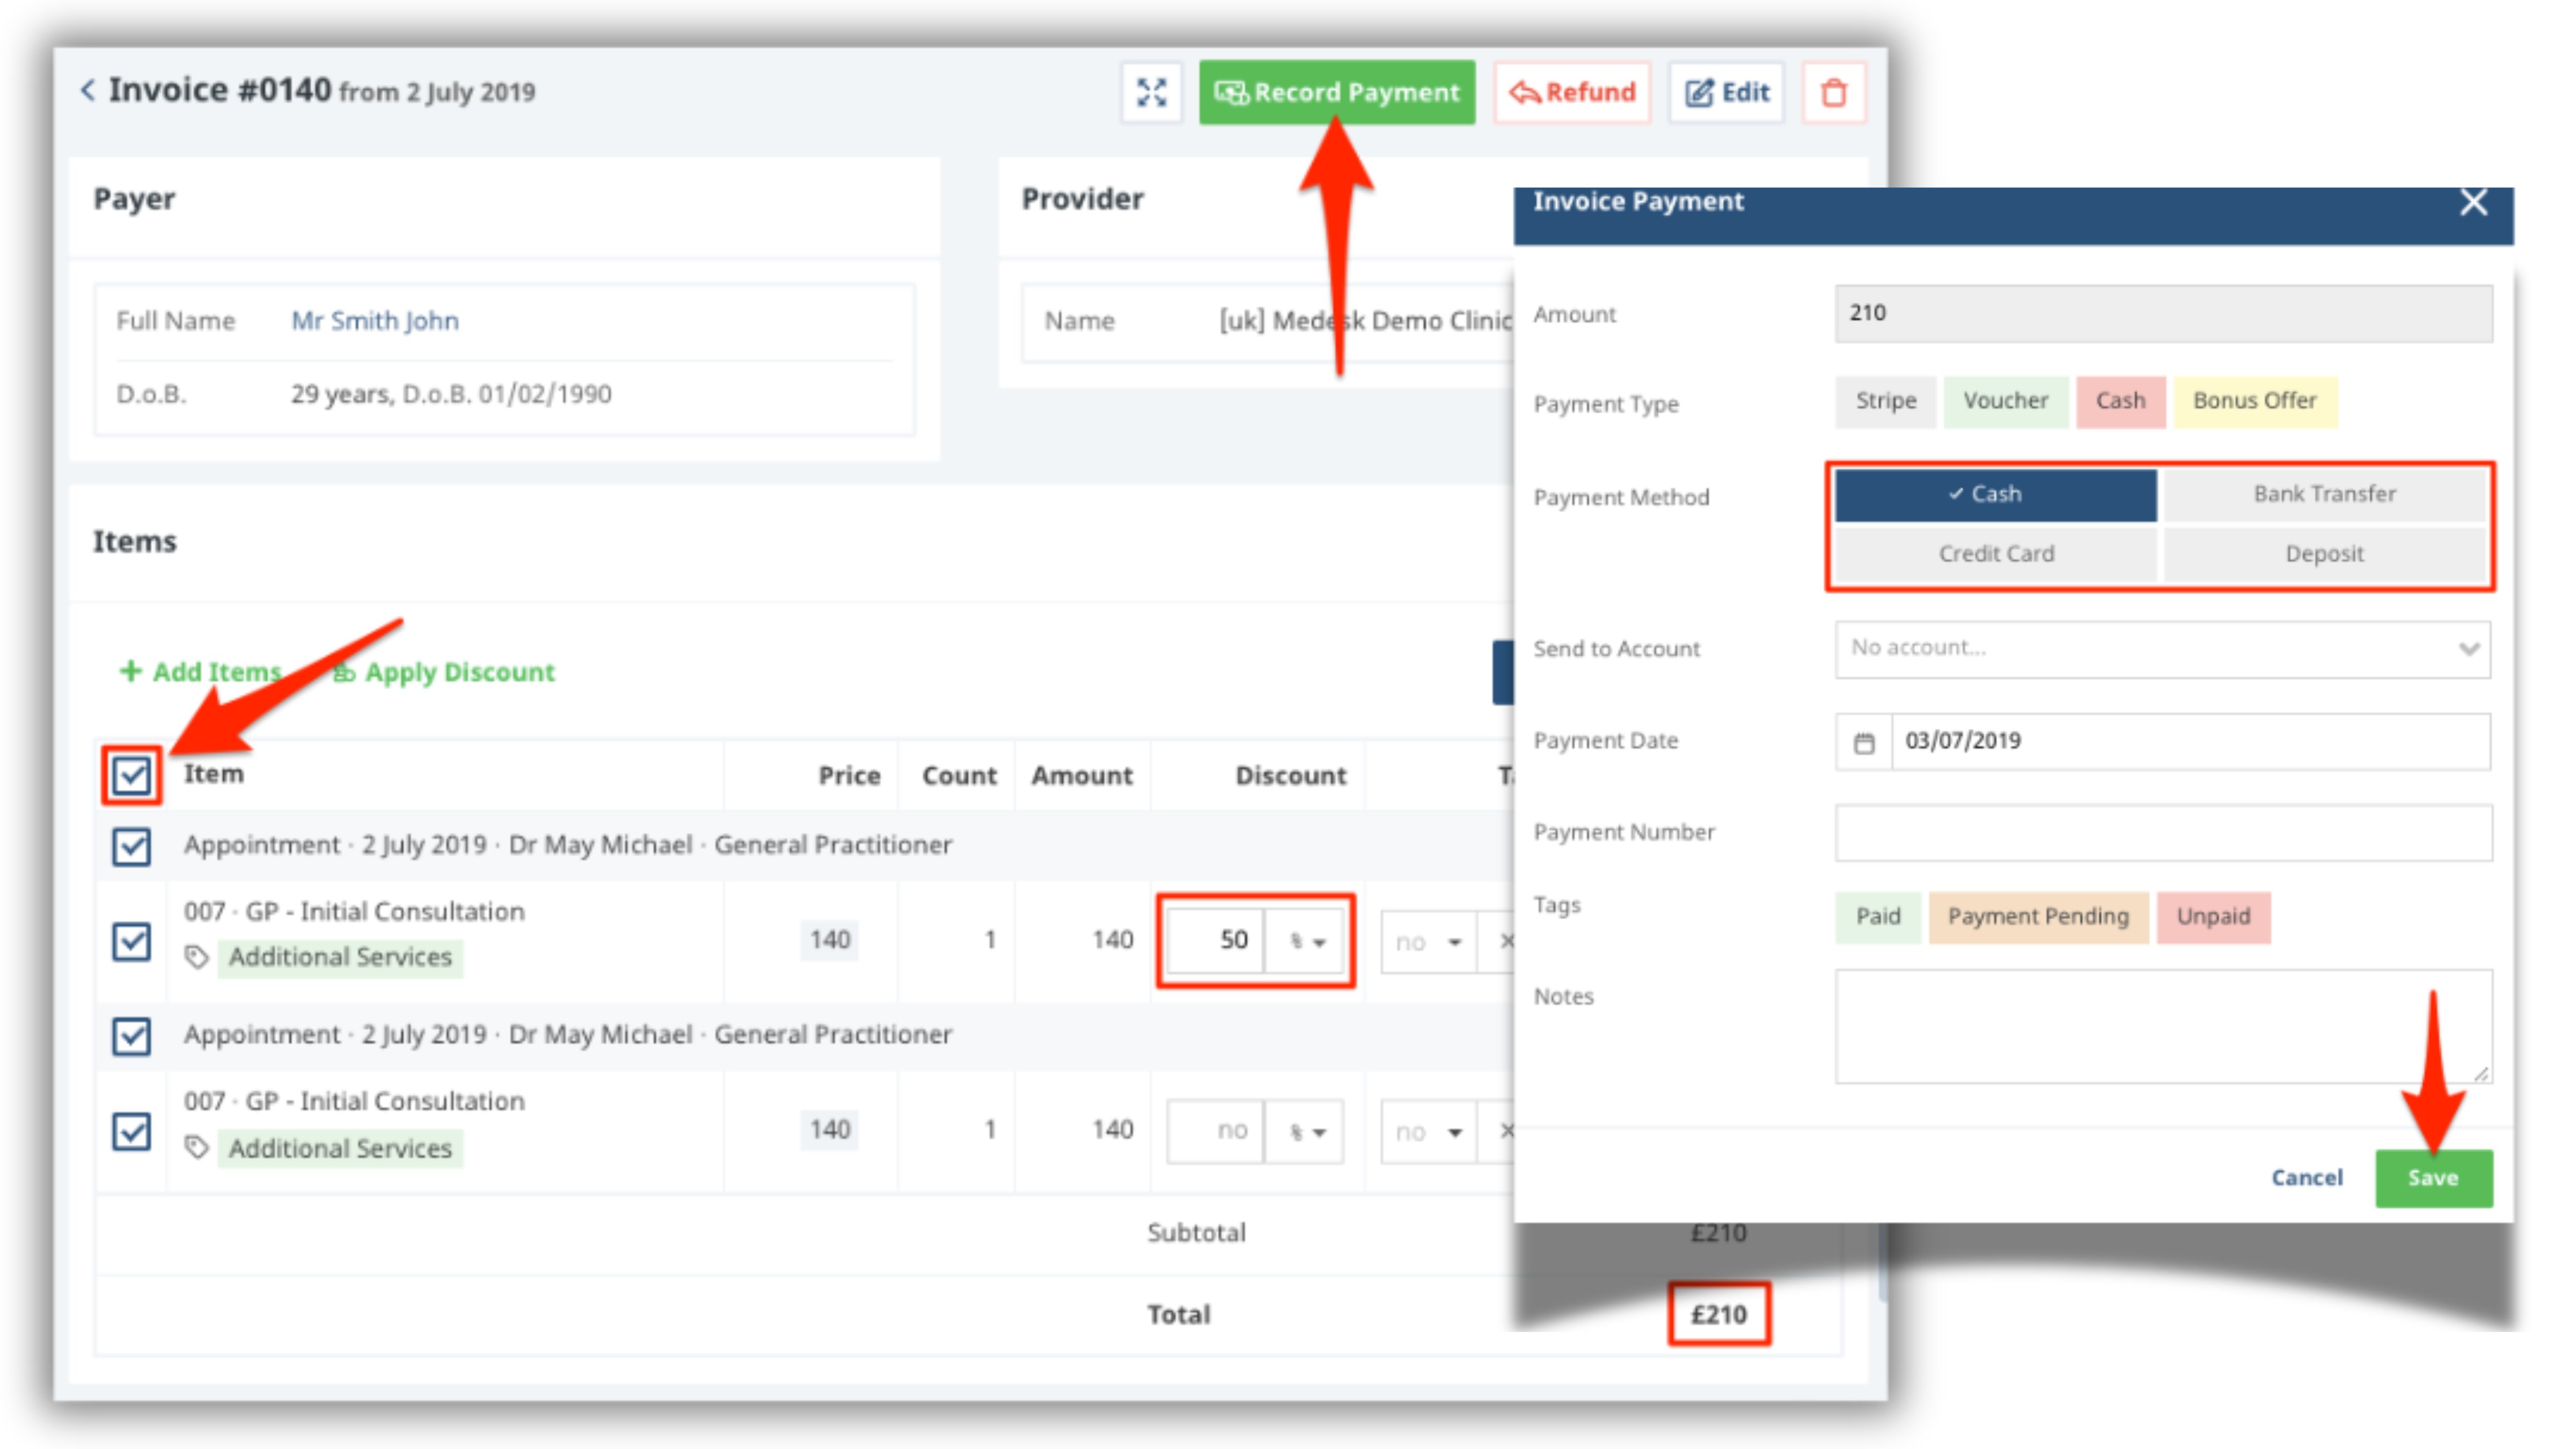
The process of recording payment looks simple. Go to the invoice and check the boxes next to the items you want to mark as paid. Then, click Record Payment and confirm the details in the window that pops up.
The Record Payment button opens a new window that contains payment information. Select the required payment type and click Save.
If a patient has an unpaid invoice remaining, then Medesk will automatically ask whether you want to add any new charges to this pre-existing invoice or make a new one.
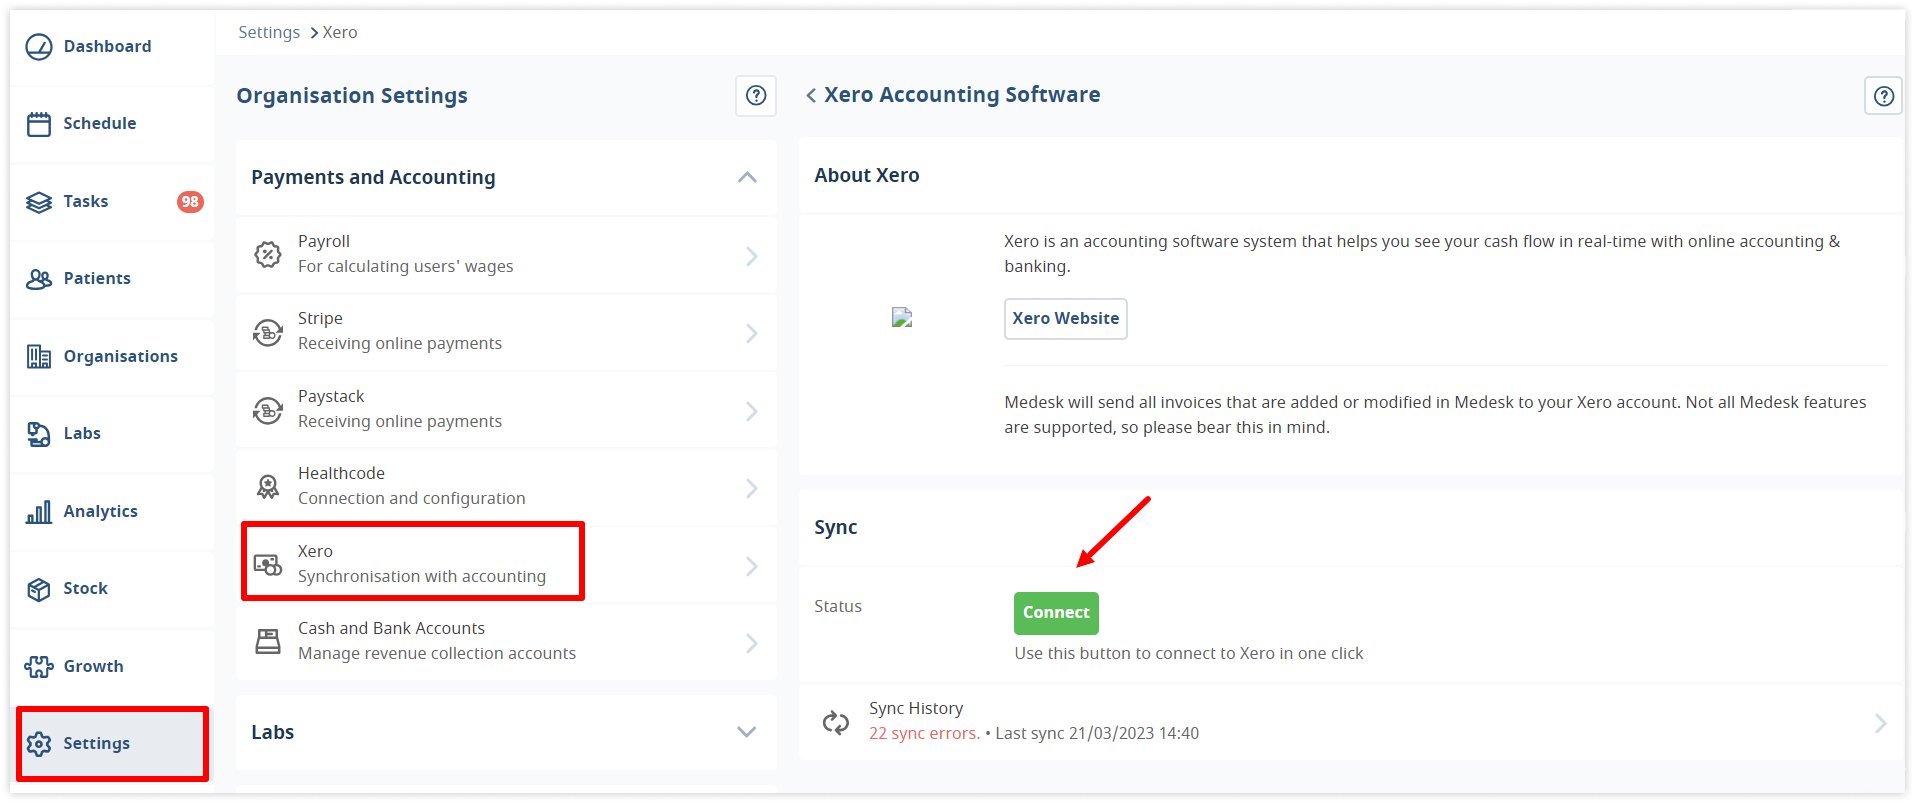
You can also set up a Xero integration. Xero is an accounting software system that helps you see your cash flow in real-time with online accounting and banking. Medesk will send all invoices that are added or modified on the platform to your Xero account. To connect the integration, go to Settings → Payments and Accounting → Xero and click Connect:
Medesk’s built-in payment and billing solutions can save practices up to 20% on administrative costs by automating much of the billing and scheduling process.
Why Medesk is the Ultimate Choice for Your Online Business Growth
Medesk is not just a telehealth implementation tool—it's a complete practice management solution that integrates all aspects of your practice, from scheduling to billing to patient communication.
The possibilities of the platform do not end with invoicing. After receiving payment from a patient, you can analyse your financial status and optimise your marketing strategies with the Reports and Analytics module.
If you are not a solo healthcare provider, but a clinic owner, the Payroll module automates payroll, calculates working hours, and helps you set different bonus percentages depending on the specific services and products sold. Medesk makes the payroll process transparent to your staff, reducing the possibility of litigation.
Interaction with patients does not end at the reception. Maintaining a trusting relationship and improving the patient experience must be continuous. The Medical CRM module gives access to automated pre- and post-treatment communication: offer discounts and birthday bonuses, make newsletters with new services, and discover how your patients find your practice with special tags.

Medesk offers 21 modules available at a cost-effective $48 per 100 appointments per month. You pay for actual visits and not for the number of users, like in user-based subscription plans. This pricing plan is much more favourable because the user is not only a doctor who brings profit to the practice but also a registrar, a technical staff member. They will not use the platform on a regular basis, and you will have to pay for them. With Medesk, you only pay for the features that you choose.
Here is what our customers have to say about Medesk:
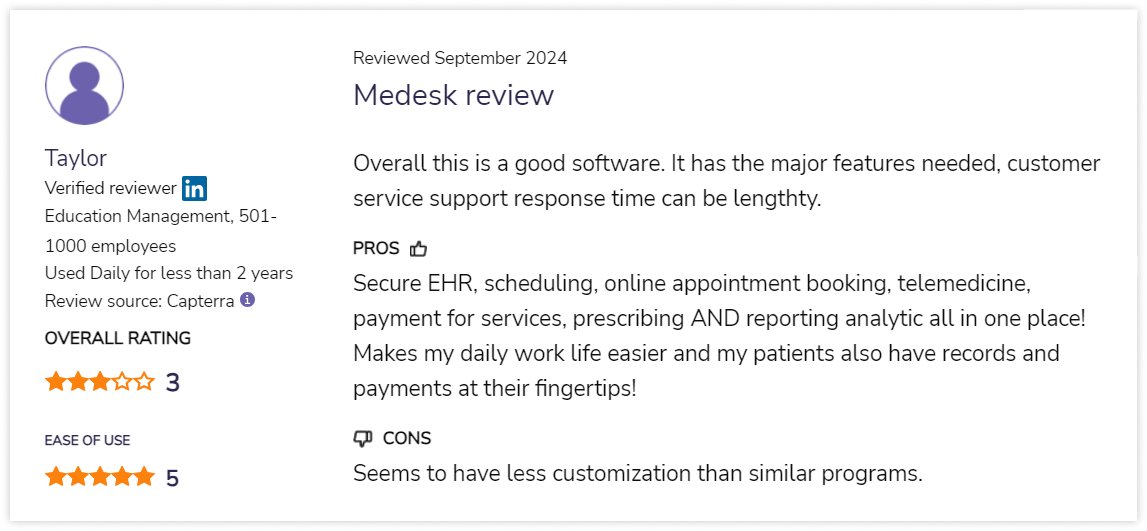
Check other customers reviews on Software Advice or read how we simplified document management at a clinic in Scotland.
The earlier you incorporate telemedicine into your practice, the more potential clients who can't come to you in person you will attract to your business. Don’t miss out on the opportunity to join the thousands of satisfied doctors and extend your reach to patients who need you. Sign up for a free trial today and start seeing results—even if you’re just exploring your options!


